
It’s your first day in Hytale, and you don’t know what to do. You’ve just spawned at the gate of the Echo with nothing in your inventory, and the world ahead looks both exciting and a bit overwhelming. We’ve spent plenty of time exploring this game, and here are some quick tips and tricks we’ve found that will help you get started.
Let’s dive in.
1. Master the Basics: Gathering and Crafting Your First Tools
Your priority is getting resources. Start by punching trees until they break down and drop wood (just like in Minecraft). While you’re doing that, pick up stone rubble from the ground. You can switch between first- and third-person camera views (by pressing “V” on your keyboard), and we recommend trying the third-person view since it provides better awareness of your surroundings.
Once you’ve collected wood logs, twigs, and stone rubble, look for plant fiber by breaking plants or berry bushes (which also may drop some berries, which will be useful later on). With these basic materials, you can craft your essential toolkit: a sword for combat, a hatchet for chopping wood faster, and a pickaxe for mining stone. These three tools are what you’ll need to get through your first day.
Here’s something worth knowing about torches. Craft at least four of them and place one in your offhand equipment slot. When you’re using your sword, pickaxe, or hatchet, that torch will automatically light up your surroundings. This makes cave exploration much less stressful. You can also place torches in the world, turn them on and off, or pick them back up when you’re done with them.
2. Optimize Your Settings for Better Gameplay
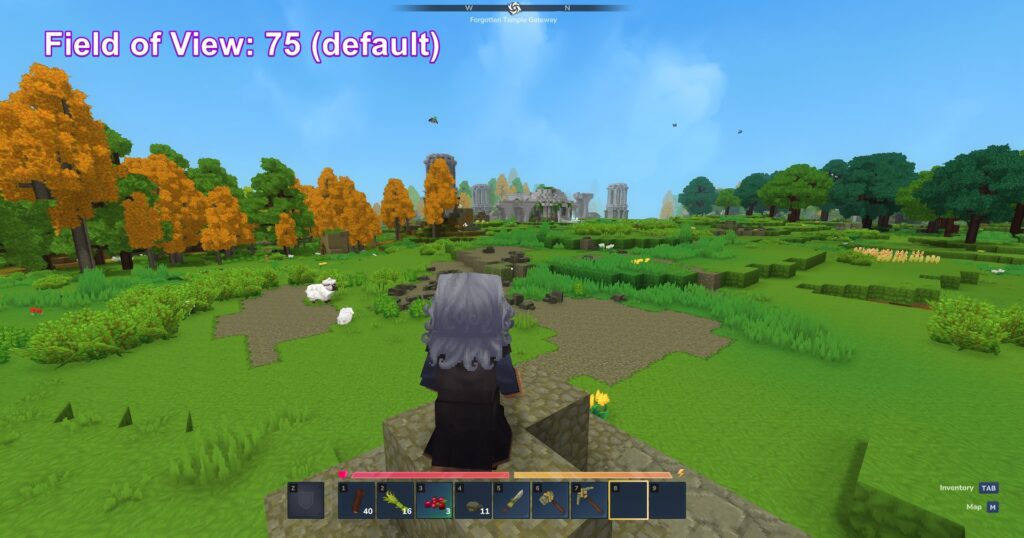
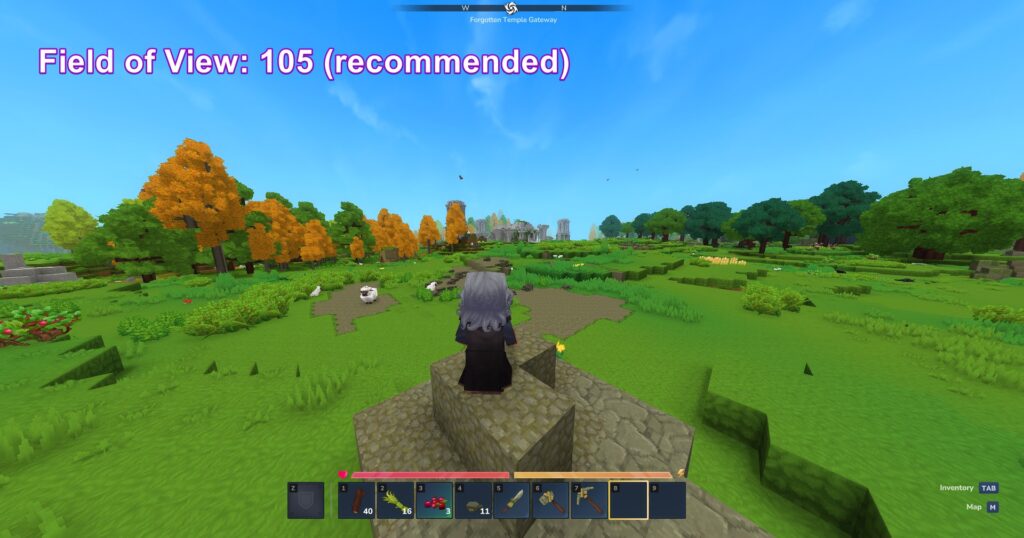
Before you wander too far, there are two settings you might want to adjust. First, increase your field of view from the default setting to somewhere between 100 and 120. The default FOV is pretty restrictive, and bumping it up gives you a much better view of your surroundings, which helps you spot threats or buildings more easily.
Second, enable “show entity health bars” in your settings. It’s turned off by default, but having it on lets you track enemy health during fights, so you’ll know exactly when they’re about to go down.
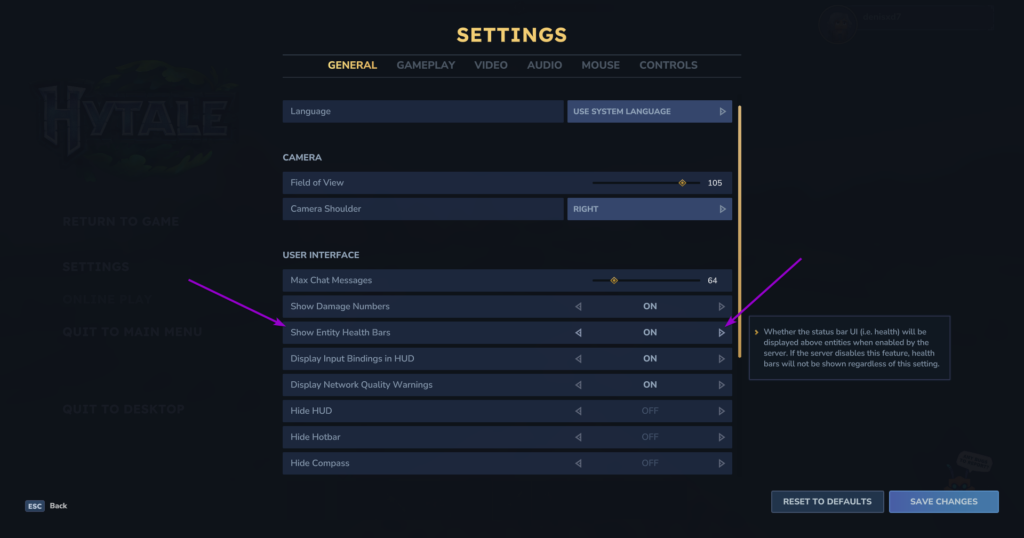
While you’re in settings, check out the crouch, sprint, and walk behavior options. You can set these to toggle mode instead of hold, which makes movement feel more natural during exploration and sneaking.
3. Learn How Combat Actually Works
Combat isn’t just about clicking as fast as you can. When you run into wolves, bears, or any hostile mobs, holding right-click will block their attacks, and this is pretty important for staying alive. Left-click for normal attacks, or hold left-click to charge up a power attack that deals more damage.
The thing to remember is that your health doesn’t come back on its own. Those berries you pick up while exploring become your lifeline. Keep them in your hotbar because they restore 5% of your HP and give you health regeneration and stamina boosts. Just remember the healing happens over time, not instantly, so don’t expect to eat a berry mid-fight and immediately shrug off the next hit.
4. Set Up a Workbench and Unlock New Crafting
Once you have enough wood and stone, craft a workbench. You can place it anywhere, and it opens up a whole new set of crafting options. The workbench has several tabs covering survival essentials, better tools, processing stations like furnaces and tanning racks, and utility items, including backpack upgrades.
One of the most useful things you can craft is the shortbow, which is perfect for hunting deer. Make about 10 arrows, and you’re ready to go. When you’re hunting deer, crouch as you approach them. If you sprint at them, they’ll just run away. Crouching lets you get close enough for a clean shot. Hold left-click to charge your arrow fully, then release. Deer drop raw meat and light hide, and that hide is especially valuable since you can turn it into light leather at tanning racks.
If you want another option, craft crude daggers. They have a dash ability when you hold left-click that makes chasing down animals much easier.
After you land enough hits with any weapon, it’ll glow blue, which means you can use a powerful signature ability for extra damage.
5. Understand Death and How to Recover
You’re going to die at some point, and that’s completely normal. When it happens, all your equipped items lose 10% durability, and you’ll drop some resources where you died. You respawn at your original spawn point, and there’s a marker on your map showing where your body is. You’ll need to get back there quickly because those dropped items won’t stick around forever.
This is why crafting a crude bedroll early on is a smart move. Place it wherever you want to respawn, interact with it, and confirm. Now, when you die, you’ll spawn there instead of having to go across the entire map. If you’re planning a long trip far from your base, break your bed and set up a new one closer to where you’re exploring. Otherwise, dying far away means a long walk back.
One more movement tip that’ll save you some pain: if you’re jumping down from high places, press roll right before you land to break your fall. Without it, you’ll take fall damage and might die.
6. Use Your Map to Navigate and Discover
Press M to open your map and zoom in to find structures and points of interest. These spots usually have treasure and useful resources. When you zoom all the way out, you can see different biomes: snowy areas with huge pine trees, blue forests with Asia trees, deserts, and more.
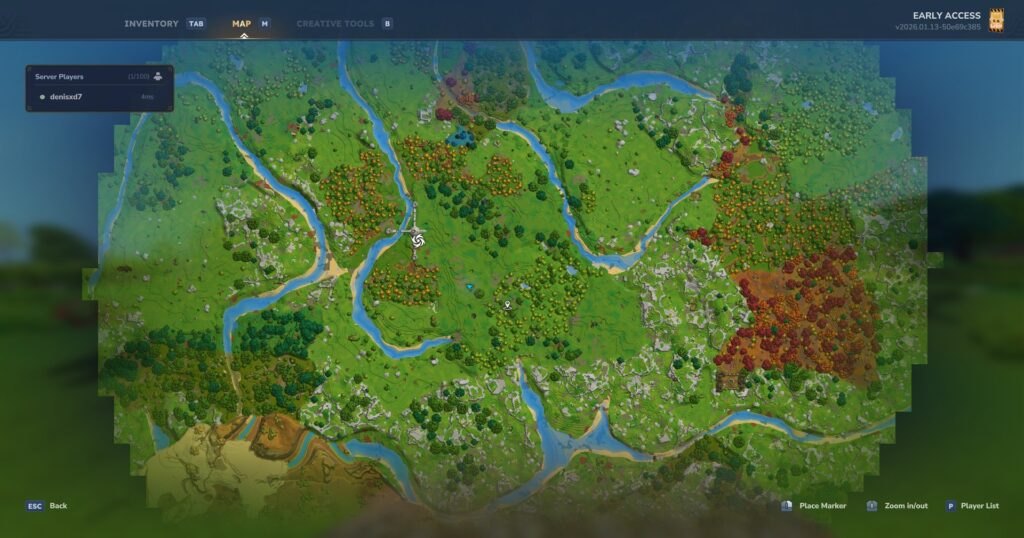
If you right-click while zoomed in, it’ll show your exact X and Z coordinates. This comes in handy when you’re trying to find your way around or share locations with friends.
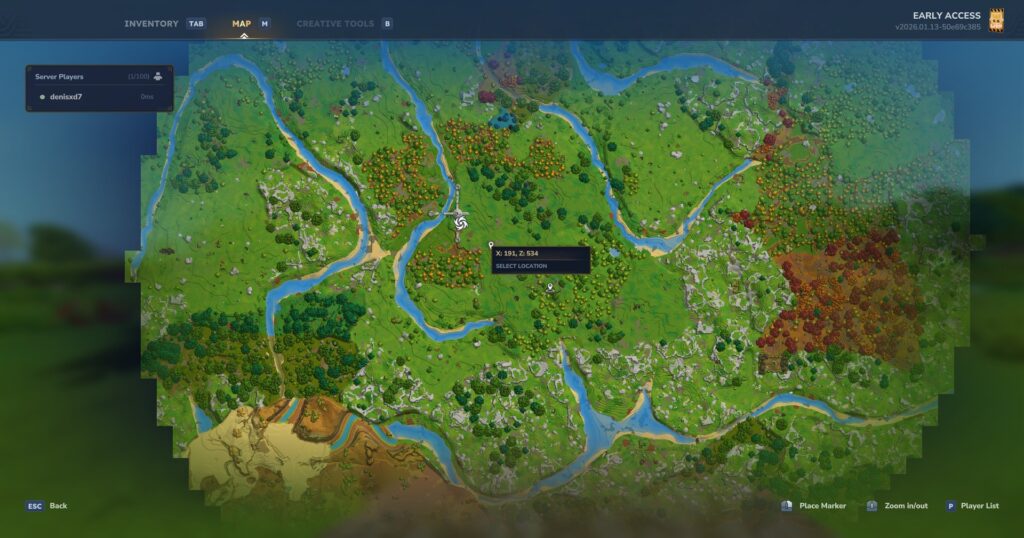
As you explore, areas you’ve already visited will fade into the fog, showing only a circle around where you currently are. If you find something important, try to remember where it is or take note of the coordinates.
When you come across horses or goats, you can actually mount them by interacting with them. This makes traveling way faster, especially when you sprint. Horses can even swim, though if you keep their heads underwater too long, they’ll start losing health.
7. Build Portals for Quick Travel
After you’ve made some progress and explored different biomes, you’ll want to set up portals. These are crafted at an archinist workbench using Asia logs from blue forests, Asia kelp, and any type of stone.
Portals are really convenient because you can name them and connect them to each other. Put one at your main base and call it “Home,” then build another one in a desert and name it “Desert.” You can set your home portal to connect to the desert one, and walking through instantly transports you across the map. You can change which portal connects to which at any time, so one portal at your base can link to several different locations just by switching the target.
Source: 04AM
This makes gathering resources and exploring much more efficient once you have the materials to build them.
A Few More Things to Keep in Mind
Keep an eye out for Quebec villages and ruins while exploring. You can climb up ledges by jumping at them, which helps when you’re scaling buildings or cliffs. In the early game, pick up pretty much everything you find because most items end up being useful sooner or later.
At night, stronger enemies show up, so early on it’s worth sleeping in a bed to skip through the darkness. If you do need to be out at night, keep a one-handed weapon equipped so you can use your offhand torch for light.
For your first few hours, focus on gathering, crafting, and getting comfortable with how things work. Hytale has a lot of depth to it, but if you nail down these basics, you’ll have a solid foundation to build on. Take your time, learn the mechanics, and you’ll be thriving in no time.
Happy exploring!
Looking for affordable Hytale Server Hosting? Prices start at $7.99. Go to Cybrancee.com and create your own Hytale Server.