
-
Game Hosting
-
- Getting support with the Pterodactyl panel
- How to Add a Port in the Pterodactyl Panel
- How To Change Pterodactyl Egg Version
- How to configure schedules in Pterodactyl
- How To Connect To Pterodactyl Via SFTP
- How to Create a Backup in Pterodactyl
- How to Create a Database on Pterodactyl
- How to create a file in Pterodactyl
- How to Delete a Backup in Pterodactyl
- How to Easily Share Pterodactyl Error Logs With Our AI Instant Support Bot
- How to Easily Upload Folders to the Pterodactyl Panel
- How to Enable/Disable Two-Step Verification on Pterodactyl
- How to Get My Pterodactyl Server IP Address
- How to Lock/Unlock a Backup in Pterodactyl
- How To Move Files In Pterodactyl
- How to Reinstall a Pterodactyl Server
- How to Rename Your Pterodactyl Server
- How to Reset Your Pterodactyl Password
- How to Restore a Backup in Pterodactyl
- How to Upload Files Through Pterodactyl
- How to Use Pterodactyl Schedules to Automatically Create Backups
- Using Pterodactyl Controls
- What is CRON syntax?
- How to Completely Reset Your Cybrancee Server
- Show Remaining Articles (9) Collapse Articles
-
- Different Minecraft Loaders
- How to Add Simple Voice Chat to Your Minecraft Server
- How to Agree to Your Minecraft Server's EULA
- How to allow cracked versions of Minecraft to join your server
- How to Ban and Unban a Player on Your Minecraft Server
- How to change Minecraft Version on Pterodactyl
- How to change the daylight cycle in Minecraft
- How to change the difficulty in Minecraft
- How to Change the MOTD of Your Minecraft Server
- How to change the Simulation Distance on your minecraft server
- How to change the View Distance on your minecraft server
- How to change the weather cycle in Minecraft
- How to change the weather in Minecraft
- How to Change Your Minecraft Server Forge Version
- How to Change Your Minecraft Server Gamemode
- How to Configure or Disable Spawn Protection for Your Server
- How to Connect a Domain (Cloudflare) to a Minecraft Server
- How to Connect a Domain to a Minecraft Server
- How to create a flat world in Minecraft
- How to Disable Player Advancement Announcements on Minecraft
- How to Disable the Minecraft Server Watchdog
- How to disable the Nether in Minecraft
- How to Disable/Enable Fire Spread on Minecraft
- How to Disabled / Enable Creeper Explosions in Minecraft
- How to Disabled/Enable TNT in Minecraft
- How to Download Your Minecraft World
- How To Enable Command Blocks In Your Minecraft Server
- How to Fix: java.lang.NumberFormatException: For input string: "default" in Minecraft Paper
- How to Host a Bedrock Minecraft Server
- How to Host a Fabric Minecraft Server
- How to Host a Forge Minecraft Server
- How to Host a NeoForge Minecraft Server
- How to Host a Paper Minecraft Server
- How to Host a Vanilla Minecraft Server
- How to Improve the Performance of Your Minecraft Server
- How to increase/decrease the player slots on Minecraft
- How to Install Geyser on Minecraft
- How to Join a Bedrock Minecraft Server on Xbox
- How to join your Vanilla Minecraft server
- How to Kick a Player In Minecraft
- How to make a player OP (Operator) in Minecraft
- How To Migrate Your Minecraft Server Away From Shockbyte
- How to Reduce RAM Usage on Your Minecraft Server
- How to See Your Additional Minecraft Ports
- How to See Your Ping in Minecraft
- How to Set a Custom World Seed on your Minecraft Server
- How to Set Up A World Border on Minecraft
- How to Upload Forge Modpacks to Your Minecraft Server
- How to Upload Minecraft Mods to Your Server
- How to Upload Your Minecraft World
- How to view the banlist in Minecraft
- Which Version of Java for your Minecraft Version
- How to Upload and Use a Custom Map on a Minecraft Server
- How to Enable Cheats on a Bedrock Server
- How to Allowlist a Minecraft Bedrock server
- How to Generate a Spark Report
- How to Change The Fabric Version on Your Minecraft Server
- Show Remaining Articles (42) Collapse Articles
-
- How to be an Admin/Owner in TShock
- How to Change the Difficulty for Terraria
- How to Host a Terraria Server
- How to Update the tModLoader Version
- How to Upload a World to Your Terraria Server
- Installing Terraria Mods with tModLoader on Pterodactyl
- How to Ban or Unban Players from Your Terraria Server
- How to Add Additional Mods to Your tModLoader Server
-
- How to Change the Gamemode of Your Space Engineers Server
- How to Change the Maximum Player Count on Your Space Engineers Server
- How to Change Your Space Engineers Server Description
- How to Change Your Space Engineers Server MOTD
- How to Change Your Space Engineers Server Name
- How to Host a Space Engineers Server
- How to Make Your Space Engineers Server Support Cross Platform
- How to Remove the PCU Limit on Your Space Engineers Server
-
- How to Change the Max Players on Your Palworld Server
- How to Change Your Palworld Server Description
- How to Change Your Palworld Server Name
- How to Host a Palworld Server
- How to Set a Server Password on Your Palworld Server
- How to Set an Admin Password on Palworld
- How to Update a Palworld Server to the Newest Version
- How to Switch Palworld to Support Xbox/Gamepass
-
- How to Change Your Valheim Server Name
- How to Change Your Valheim World Name
- How to Enable Crossplay Support on Your Valheim Server
- How to Host a Valheim Server
- How to Make Your Valheim Server Show on Community Servers
- How to See/Change Your Valheim Server Password
- How to Upload Your Own World to Valheim
- How to Add Mods to a Valheim Server
-
- How to Add a Password to Your Ark: Survival Evolved Server
- How to Allow Shared Accounts to Join Your Ark: Survival Evolved Server
- How to Change the Map on an Ark: Survival Evolved Server
- How to Enable Crossplay on an Ark: Survival Evolved Server
- How to Host an Ark: Survival Evolved Server
- How to Install Mods on an Ark: Survival Evolved Server
- How to Completely Reset an Ark: Survival Evolved Server
- How to Enable Events on an Ark: Survival Evolved Server
-
-
Discord Bot Hosting
-
- Changing Discord Bot Start Up File on Pterodactyl
- Bot is Running, But Doesn't Show as Online on Pterodactyl
- Getting support with the Pterodactyl panel
- How to Add a Port in the Pterodactyl Panel
- How To Automatically Restart Your Bot After Pushing Changes To GitHub
- How To Change Pterodactyl Egg Version
- How to configure schedules in Pterodactyl
- How To Connect To Pterodactyl Via SFTP
- How to Create a Backup in Pterodactyl
- How to Create a Database on Pterodactyl
- How to create a file in Pterodactyl
- How to Delete a Backup in Pterodactyl
- How to Easily Share Pterodactyl Error Logs With Our AI Instant Support Bot
- How to Easily Upload Folders to the Pterodactyl Panel
- How to Enable/Disable Two-Step Verification on Pterodactyl
- How to Get My Pterodactyl Server IP Address
- How to Lock/Unlock a Backup in Pterodactyl
- How To Move Files In Pterodactyl
- How to Reinstall a Pterodactyl Server
- How to Rename Your Pterodactyl Server
- How to Reset Your Pterodactyl Password
- How to Restore a Backup in Pterodactyl
- How to Upload Files Through Pterodactyl
- How to use Git in Pterodactyl
- How to Use Pterodactyl Schedules to Automatically Create Backups
- Using Pterodactyl Controls
- What is CRON syntax?
- How to Completely Reset Your Cybrancee Server
- Show Remaining Articles (13) Collapse Articles
-
-
Cybrancee Client Area
-
Domains
-
Emails
-
Website/WordPress Hosting
-
- Accessing and Creating FTP Users in Plesk
- Adding an Addon Domain in Plesk
- Adding an SPF Record in Plesk
- Adding an SSL Certificate in Plesk
- Blocking IP Addresses From Accessing Websites in Plesk
- Changing the PHP Version in Plesk
- Changing the Upload File Size Limit in Plesk
- Enabling The .htaccess File in Plesk
- Extending SSL Coverage to Include Mail in Plesk
- How to Add a ZeroSSL Certificate In Plesk
- How to change the WordPress installation folder in Plesk
- How to Create Additional Plesk Users
- How to Create MySQL Databases in Plesk
- How to create MySQL Users in Plesk
- How to create Subdomains in Plesk
- How to detach and attach WPToolkit in Plesk
- How to Extract From a Zip File in Plesk
- How to Force HTTPS in Plesk
- How to Log Into WordPress via Plesk
- How to Move a File in Plesk
- How to Rename a File in Plesk
- How to Update Your Plesk Profile Password and Email Address
- How to Upload Files in Plesk
- How to View Disk and Traffic Usage in Plesk
- Managing DNS in Plesk
- Managing User Roles in Plesk
- Setting up Email Forwarding in Plesk
- Understanding and Modifying File Permissions in Plesk
- Using Google PageSpeed Insights in Plesk
- What is CRON syntax?
- Show Remaining Articles (15) Collapse Articles
-
- How to change the WordPress installation folder in Plesk
- How to detach and attach WPToolkit in Plesk
- How to Install a Plugin on WordPress
- How to Install a Theme on WordPress
- How to Log Into WordPress via Plesk
- How to Secure Your WordPress Installation in Plesk
- How to Upload a Plugin to WordPress
- How to Upload a Theme to WordPress
- Installing WordPress in Plesk
How to change the WordPress installation folder in Plesk
Before following this guide, please take a backup of your website. Also note, your WordPress site will not be accessible until you have completed all steps of this process.
You will need to be logged into your Plesk control panel and also your WordPress site to do this. Use the below two guides for assistance:
1. Once logged into WordPress, navigate to the General Settings page
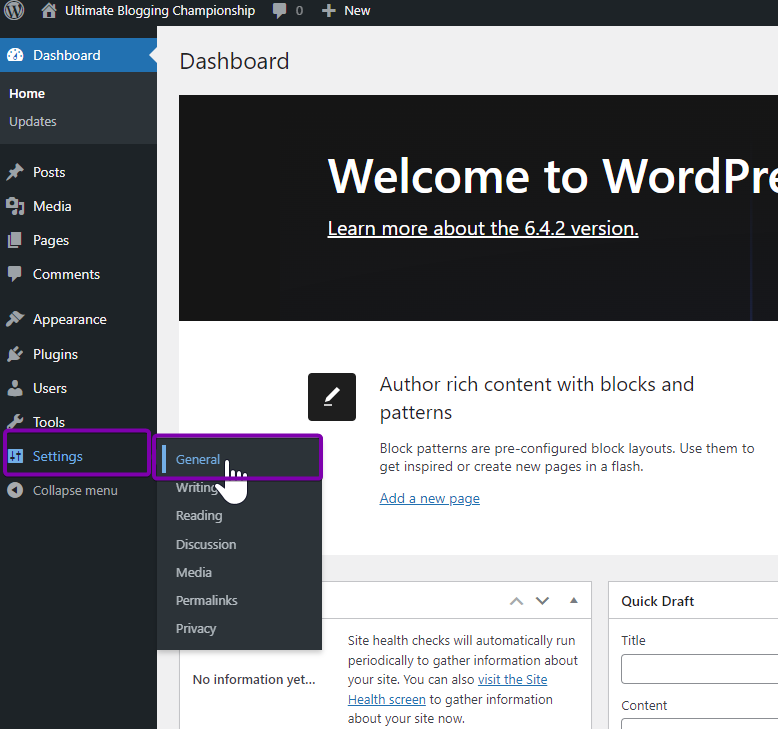
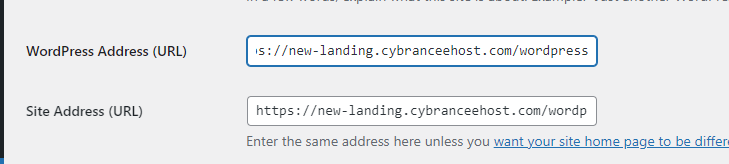
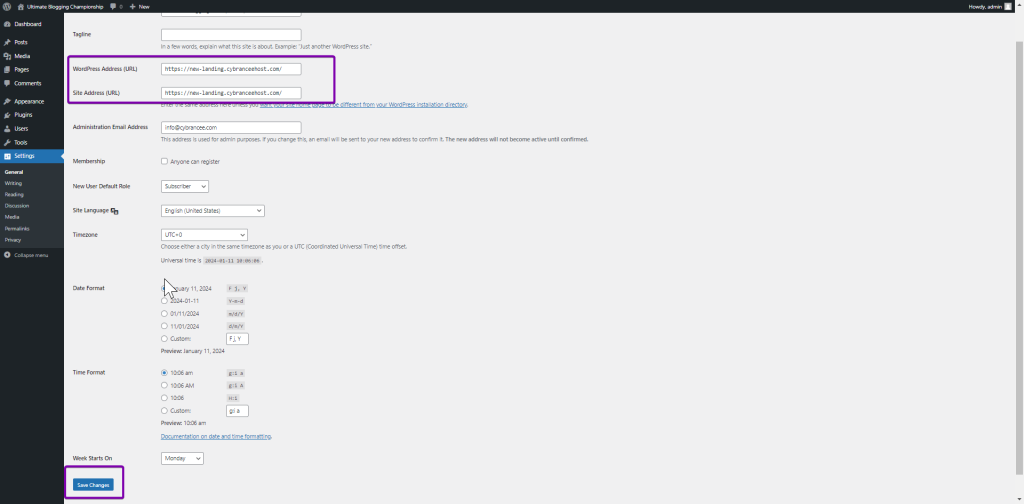
2. Update the WordPress Address (URL) and Site Address (URL) field to have the new path. In this example, we want to remove the /wordpress/ directory so that everything is at the root.
3. Scroll down and press the Save Changes button (When you press this button, your WordPress website will go offline – follow the rest of the guide to complete)
4. Go to your Plesk Control Panel and head to the File Manager
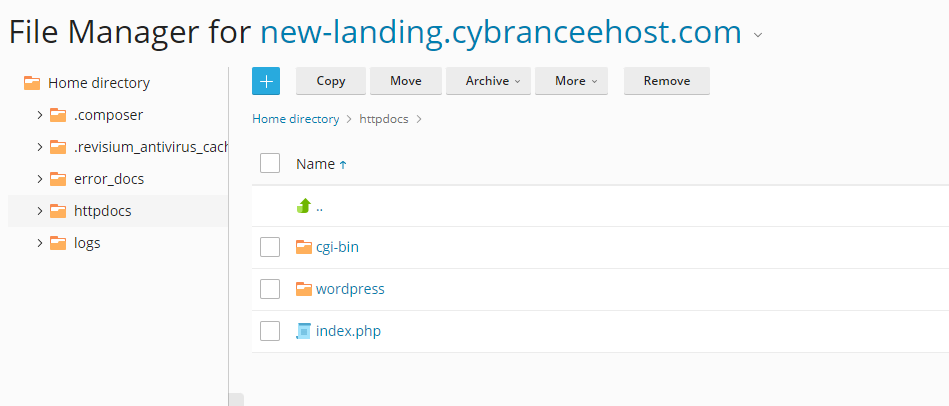
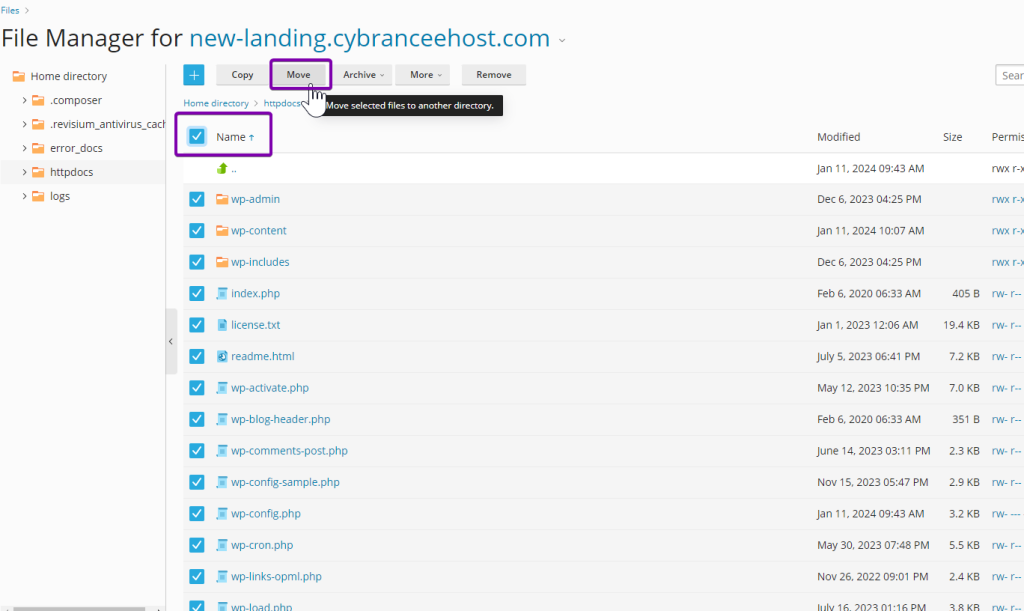
5. You will see in this example, all of the WordPress files are in the wordpress folder. Go to the WordPress folder, highlight all files and press the Move button
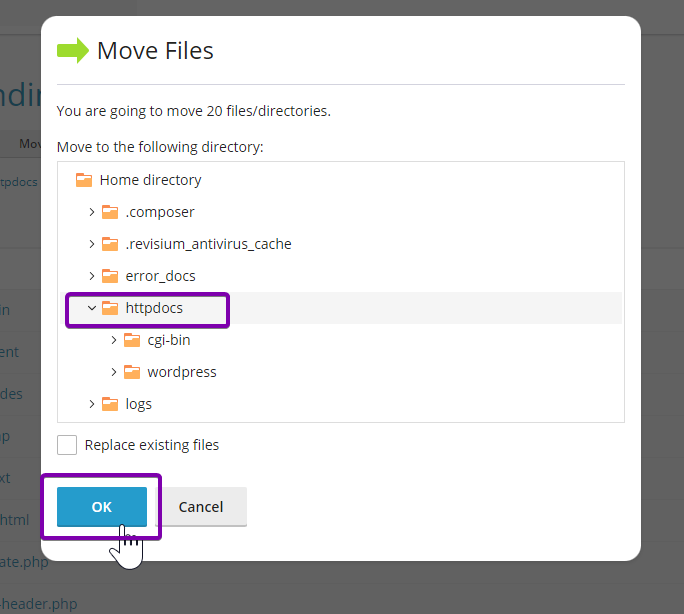
6. Select the new folder and press OK (If you have files in the location you are moving the new files to, press the Replace existing files to overwrite them)
7. Your WordPress website will now be available on the new file path!
8. A side effect of this is that the WPToolkit will need to be detached and attached again. Follow this guide here to complete this task: https://cybrancee.com/learn/knowledge-base/how-to-detach-and-attach-wptoolkit/