-
Minecraft
-
- How to Host a Velocity Minecraft Server With Paper
- How to Host a Paper Minecraft Server
- How to Host a NeoForge Minecraft Server
- How to Host a Fabric Minecraft Server
- How to Host a Bedrock Minecraft Server
- How to Host a Forge Minecraft Server
- How to Host a Vanilla Minecraft Server
- How to Join Your Vanilla Minecraft Server
- Different Minecraft Loaders
-
- How to Allowlist a Minecraft Bedrock server
- How to Enable Cheats on a Minecraft Bedrock Server
- How to Upload and Use a Custom Map on a Minecraft Server
- How to Disable the Minecraft Server Watchdog
- How to Join a Bedrock Minecraft Server on Xbox
- How to Connect a Domain (Cloudflare) to a Minecraft Server
- How to Connect a Domain to a Minecraft Server
- How to See Your Additional Minecraft Ports
- How to Download Your Minecraft World
- How to Change the MOTD of Your Minecraft Server
- How to Set a Custom World Seed on Your Minecraft Server
- How to Allow Cracked Versions of Minecraft to Join Your Server
- How to Create a Flat World in Minecraft
- How to Increase/Decrease the Player Slots in Minecraft
- How to Change the View Distance on Your Minecraft Server
- How to Agree to Your Minecraft Server's EULA
- How to Change Your Minecraft Server Version
- How to Change Minecraft Servers Player Slots
- How to Automatically Restart Your Minecraft Server
- How to Configure RCON on Your Minecraft Server
- Which Version of Java For Your Minecraft Version
- Minecraft Loaders Explained: Forge, Vanilla, Fabric, Paper, Bedrock, NeoForge
- How to Upload Your Minecraft World
- How to Enable Experiments on Minecraft Bedrock
- How to Configure Autosaving in Minecraft
- How to Reset Your Minecraft World
- How to Change the Tick Rate on a Minecraft Server
- How to Download and Use Your Realms World
- How to Change the Mob Spawn Rate on a Minecraft Server
- How To Setup Whitelisting on Your Minecraft Server
- How to Reset World Statistics on Your Minecraft Server
- Show all articles ( 16 ) Collapse Articles
-
- How to Change the Simulation Distance on Your Minecraft Server
- How to Disable Player Advancement Announcements on Minecraft
- How to Set Up a World Border on Minecraft
- How to Disabled/Enable Creeper Explosions in Minecraft
- How to Disabled/Enable TNT in Minecraft
- How to Disable/Enable Fire Spread on Minecraft
- How to Disable the Nether in Minecraft
- How To Enable Command Blocks in Your Minecraft Server
- How to Configure or Disable Spawn Protection for Your Server
- How to Kick a Player in Minecraft
- How to Change Your Minecraft Server Gamemode
- How to View the banlist in Minecraft
- How to Ban and Unban a Player on Your Minecraft Server
- How to Change the Difficulty in Minecraft
- How to Change the Weather in Minecraft
- How to Change the Daylight Cycle in Minecraft
- How to Enable Flying on Your Minecraft Server
- How to Set a World Server Spawn on Your Minecraft Server
- How to Disable the End in Minecraft
- How to make a player OP (Operator) in Minecraft
- How to Give Your Minecraft Client More RAM
- How to Set a World Server Spawn Location in Minecraft
- How To Enable Coordinates on Your Minecraft Server
- Show all articles ( 8 ) Collapse Articles
-
- How to Upload Mods to Your Minecraft Server
- How to Change Your Minecraft Server Forge Version
- How to Install Geyser on Minecraft
- How to Upload Forge Modpacks to Your Minecraft Server
- How to Update Modpacks on Your Minecraft Server, Using SFTP
- How to Update Modpacks on Your Minecraft Server
- How to Change The Fabric Version on Your Minecraft Server
- How to Add Simple Voice Chat to Your Minecraft Server
- How to Export Your Modpack to Curseforge
- How to Export Your Modpack to Modrinth
- How to Install 'All the Mods 10' on Your Minecraft Server
- How to Install ‘1.12.2 Pack’ on Your Minecraft Server
- How to Install 'All the Mods 9' on Your Minecraft Server
- How to Install 'SkyFactory' on Your Minecraft Server
- How to Add Addons to Your Minecraft Bedrock Server
-
-
Discord Bot Hosting
-
- How to Use Selenium With Your Python Discord Bot
- How to Add Additional Python Modules in Pterodactyl
- How to Use PyNaCl for Your Discord Bot
- How to Connect Your Python Discord Bot to a MySQL Database
- How to Set up a HTTP Endpoint for Your Python Discord Bot
- How to Use SQLite For Your Python Discord Bot
-
- How to Find a Discord Role ID
- How to Find a Discord Channel ID
- How to Find a Discord Guild ID
- How to Find a Discord User ID
- How to Enable Developer Mode on Discord
- How to Find a Discord Event ID
- How to Find a Discord Thread ID
- How to Find a Discord Message ID
- How to Automatically Restart Your Bot After Pushing Changes to GitHub
- How To Externally Host a Replit Discord Bot
- How to Reset Your Discord Bot Token
- How to Enable Privileged Intents for Discord Bots
- How To Pause Invites on Your Discord Server
- How To Enable Community on Your Discord Server
- How To Configure Your Discord Server Notifications
- How To Configure Your Discord Server Privacy Settings
- How To Make Your Discord Server Age-Restricted
- How To Get Your Discord Server on Discovery
- Show all articles ( 3 ) Collapse Articles
-
Rust
-
- How to Configure the Missile Silo Timer on Your Rust Server
- How to Configure Building Decay on Your Rust Server
- How to Configure Easy Anti-Cheat on Your Rust Server
- How to Configure Team Size on Your Rust Server
- How To Add Server Tags To Your Rust Server
- How to Change the Game Mode on Your Rust Server
- How to Change Your Rust Server Description, Header Image and URL
- How to Change the Name of Your Rust Server
- How to Change Your Rust Server World Map Size
- How to Change Your Rust Server Map Seed
- How to Change the Rust RCON Password
- How To Enable Hardcore Mode On Your Rust Server
- How To Setup Logging For Your Rust Server
- How to Set Up RCON on Your Rust Server
- How to Spawn Trains & Railways on Your Rust Server
- How To Update the Server Header Image on Your Rust Server
- How To Set A Custom Map On Your Rust Server
- How to Configure a Custom Domain for your Rust Server
- How to Pair the Rust+ Mobile App With Your Server
- How to Point Your Rust Server to a Custom Domain using Cloudflare
- How to Add Your Rust Server to Favourites
- How to Change Rust Server World Size and Seed
- How to List Your Rust Server as a Community Server
- How To Add Custom Chat Emojis On Your Rust Server
- How To Turn On Free Build Mode On Your Rust Server
- How To Configure Your Rust Server For PvE Gameplay
- How To Change Your Rust Server Icon or Logo
- How To Create a Softcore Rust Server
- How To Keep Tea Boosts After Player Death on Your Rust Server
- How To Stop Patrol Helicopters From Fleeing On Your Rust Server
- How To Activate Tutorial Island Mode on Your Rust Server
- How To Add Players To Custom Oxide Groups on Your Rust Server
- How To Change Your Rust Server Era to Medieval or Primitive
- How To Disable Radiation Zones On Your Rust Server
- How To Adjust Hackable Crate Timers On Your Rust Server
- How To Make Your Rust Server Premium
- How To Install the Discord Extension On Your Rust Server
- Show all articles ( 22 ) Collapse Articles
-
- How to Find a Rust User’s SteamID
- How to Connect Centralized Banning to Your Rust Server
- How To Ban/Unban Someone On A Rust Server
- How To Set Administrators on Your Rust Server
- How To Make Your Rust Server Private
- How to See Your Ping in Rust
- How to Manage Time on Your Rust Server
- How to Set Up RCON on Your Rust Server
- How to Use Rust Oxide Permission System
- How to View Active Players on Your Rust Server
- How to Mute or Unmute Players on Your Rust Server
- How to Check Server Join History on Your Rust Server
- How to Use Console Commands for Airdrops on Your Rust Server
- Rust Admin Commands List
- How To Read Rust Error Logs
- Complete Guide to All Rust Debug Camera Commands
- How To Spawn Every Deployable Item On Your Rust Server
- Show all articles ( 2 ) Collapse Articles
-
- How to Enable a Whitelist on Your Rust Server
- How to Configure Custom Loading Messages on Your Rust Server
- How to Install Carbon on Your Rust Server
- How to Install Oxide on Your Rust Server
- How to Install Oxide Plugins on Your Rust Server
- How to Increase Item Stack Limits in Your Rust Server
- How to Increase Gather Rates in Your Rust Server
- How to Install Plugins with Carbon on Your Rust Server
- How To Make Your Rust Server Private
- How to Install Harmony Mods on Your Rust Server
- How to Activate Better Loot on Your Rust Server
- How to Set Up Automatic Server Messages on Your Rust Server
- How to Add Custom Kits on Your Rust Server
- How to Update Oxide/Rust on Your Rust Server
- How to Install Vanish Plugin on Your Rust Server
- How to Install Death Notes Plugin on Your Rust Server
- How to Install No Give Notices Plugin on Your Rust Server
- How to Install Quick Smelt Plugin on Your Rust Server
- How to Install Furnace Splitter Plugin on Your Rust Server
- How to Install Copy Paste Plugin on Your Rust Server
- How to Install NTeleportation Plugin on Your Rust Server
- How to Install Admin Radar Plugin on Your Rust Server
- How to Install Backpacks Plugin on Your Rust Server
- How to Install Remover Tool Plugin on Your Rust Server
- How To Adjust Recycler Collection Speed On Your Rust Server
- How to Mute or Unmute Players on Your Rust Server
- Trusted Rust Plugin Websites For Your Server
- How To Activate Instant Crafting on Your Rust Server
- How To Allow Locking Of All Vehicles on Your Rust Server
- How To Enable Automatic Building Upgrades on Your Rust Server
- How To Enable Skip Night Voting on Your Rust Server
- How To Add Players To Custom Oxide Groups on Your Rust Server
- How To Add Custom Images To Signs On Your Rust Server
- How To Share Blueprints On Your Rust Server
- How To Install The Chaos Extension To Your Rust Server
- How To Turn Off Plugin Watchers On Your Rust Server
- How To Install the Discord Extension On Your Rust Server
- How To View Player Inventories on Your Rust Server
- Show all articles ( 23 ) Collapse Articles
-
- How to Change How Often Your Rust Server Saves
- How to Configure Automatic Wipes on Your Rust Server
- How to Set a Server Restart Schedule in Rust
- How to Backup and Restore Your Rust Server
- Optimising Your Rust Server to Reduce RAM
- How To Wipe a Rust Server: Including World, Blueprints and Playerdata
- How To Read Rust Error Logs
- How To Reset Player Data On Your Rust Server
-
- How to Pair the Rust+ Mobile App With Your Server
- How to Setup the CCTV Camera in Rust with Code List
- How to Use the Rust+ App to Manage CCTV Cameras
- How to Set Up Smart Lights Using the Rust+ App
- How to Receive Notifications from Smart Alarms in Rust+
- How To Set Up Custom Radio Stations On Your Rust Server
- How to Connect Smart Alarms in the Rust+ App
- How To Change Your Rust Player Seed
- Complete Guide to All Rust Debug Camera Commands
- How To Spawn Every Deployable Item On Your Rust Server
- How To Adjust Hackable Crate Timers On Your Rust Server
- How To Make Cinematic Animations on Your Rust Server
- How To Record Demos on Your Rust Server
-
Palworld
- How to Switch Palworld to Support Xbox/Gamepass
- How to Update a Palworld Server to the Newest Version
- How to Set a Server Password on Your Palworld Server
- How to Set an Admin Password on Palworld
- How to Change Your Palworld Server Description
- How to Change Your Palworld Server Name
- How To Change the Death Penalty on a Palworld Server
- How To Change the Difficulty in Palworld
- How to Change Rates in Palworld (Spawn, Damage, EXP, etc)
- How To Become an Admin on Your Palworld Server
-
Valheim
- How to Add Mods to a Valheim Server
- How to Enable Crossplay Support on Your Valheim Server
- How to Make Your Valheim Server Show on Community Servers
- How to Change Your Valheim World Name
- How to Change Your Valheim Server Name
- How to Upload Your Own World to Valheim
- How to See/Change Your Valheim Server Password
- How to Change the World Modifiers in Valheim
-
Terraria
- How to Upload a World to Your Terraria Server
- How to Update the tModLoader Version
- How to be an Admin/Owner in TShock
- How to Change the Difficulty for Terraria
- Installing Terraria Mods with tModLoader
- How to Ban or Unban Players From Your Terraria Server
- How To Change the Day/Night Cycle in Terraria
- How to Add a Custom MOTD on Terraria
- How To Backup and Restore Your Terraria World
- How to Change Your Terraria Server Password
- How to Change the Size of Your Terraria Server World
- How To Add a Whitelist to Your Terraria (TShock) Server
- How To Add and Remove Admins From Terraria Your (TShock) Server
- How To Join Your Terraria Server
- How to enable PVP in Terraria
- How To Create a New Terraria Character (on PC)
- How To Stop a Terraria World From Regenerating After Restarts
- How To Reset Your Terraria Server World
- How To Download Your Terraria Server World
- How To Install & Setup TShock on Your Terraria Server
- How To Change Your Terraria Server Version
- How To Transfer Your Single Player Terraria World to Your Dedicated Server
- How To Use a Custom World on Your Terraria Server
- Show all articles ( 8 ) Collapse Articles
-
Ark: Survival Evolved
- How to Enable Events on an Ark: Survival Evolved Server
- How to Completely Reset an Ark: Survival Evolved Server
- How to Change the Map on an Ark: Survival Evolved Server
- How to Install Mods on an Ark: Survival Evolved Server
- How to Enable Crossplay on an Ark: Survival Evolved Server
- How to Add a Password to Your Ark: Survival Evolved Server
- How to Allow Shared Accounts to Join Your Ark: Survival Evolved Server
- How To Enable Cave Flying in Ark: Survival Evolved
- How To Disable BattlEye Anti-Cheat on Ark: Survival Evolved
-
Ark: Survival Ascended
-
Satisfactory
- How to Mod Your Satisfactory Server
- How to Join Your Satisfactory Server
- How To Add a Password To Your Satisfactory Server
- How To Adjust Your Satisfactory Server Settings
- How to Access the Ingame Console of Satisfactory
- How To Change Max Players on Your Satisfactory Server
- How To Change the Admin Password on Your Satisfactory Server
- How To See Your Ping on Your Satisfactory Server
- How To Download a Save From Your Satisfactory Server
- How To Reset the Admin Password on Your Satisfactory Server
- How To Change the Server Name on Your Satisfactory Server
- How To Disable Auto-Pause on Your Satisfactory Server
-
Factorio
-
Project Zomboid
-
- How To Setup RCON for Your Project Zomboid Server
- How To Whitelist a Project Zomboid Server
- How to Make Your Project Zomboid Server Private
- How To Set the Spawn Point of Your Project Zomboid Server
- How To Change the Name and Description of Your Project Zomboid Server
- How To Apply a Sandbox Preset on a Project Zomboid Server
- How To Become an Admin on Your Project Zomboid Server
- Enabling the Minimap on Your Project Zomboid Server
- How to Adjust Your Project Zomboid Server Settings
- How to Add a Password to a Project Zomboid Server
- How To Locate Your Project Zomboid Server Crash Logs
- How To Make Project Zomboid Servers Public
- How Reveal the Map in Project Zomboid
- How to Configure Zombie Hearing and Vision Range on Your Project Zomboid Server
- How to Disable or Configure the Helicopter Event in Your Project Zomboid Server
- How To Enable and Configure the Starter Kit on Your Project Zomboid Server
- How to Enable Trash Containers Functionality on Your Project Zomboid Server
- How to Configure Vehicle Speed Limits on Your Project Zomboid Server
- How to Enable Safehouse Claim on Your Project Zomboid Server
- How to Enable Automatic Cleanup of Dropped Items on Your Project Zomboid Server
- How to Optimize Your Project Zomboid Server
- How to View Players Skill Progression Logs on Your Project Zomboid Server
- How to Fix the ‘Failed To Download Map From Server’ Error on Your Project Zomboid Server
- How to Fix the Reversion of Changes in Sandbox Options on Your Project Zomboid Server
- Show all articles ( 9 ) Collapse Articles
-
- How To Access the Admin Panel on a Project Zomboid Server
- Managing User Access Levels in Project Zomboid
- Project Zomboid Admin Panel Options
- How To Spawn Items and Vehicles on a Project Zomboid Server
- How To Teleport on a Project Zomboid Server
- How To Kick or Ban a Player From Your Project Zomboid Server
- How To Change the Zombie Spawn Rates on Your Project Zomboid Server
- How To Display Players on the Map on a Project Zomboid Server
- How To Change Playstyle on Your Project Zomboid Server
- How to Give Yourself XP Levels in Project Zomboid
- How to Get an Item ID on Your Project Zomboid Server
- How to View Other Players Inventories on Your Project Zomboid Server
- How to Remove Large Amounts of Zombie Corpses on Your Project Zomboid Server
- How to Copy Structures/Tiles on Your Project Zomboid Server
- How to Modify Item/Object Properties on Your Project Zomboid Server
- How to Expand a Safezone Size on Your Project Zomboid Server
- How to Spawn Zombie Hordes on Your Project Zomboid Server
- How to Create PVP-Free Zones on Your Project Zomboid Server
- How to Disable Zombie Virus Infection on Your Project Zomboid Server
- How to Enable or Disable Fire Spread Mechanics on Your Project Zomboid Server
- How to Enable or Disable Sleep on Your Project Zomboid Server
- How to Manually Regenerate Loot in a Container in Your Project Zomboid Server
- How to Enable or Disable PVP on Your Project Zomboid Server
- How to Enable or Disable Sledgehammer Usage on Your Project Zomboid Server
- How to Change How Often Your Project Zomboid Server Saves
- How to View the Designated Area of a Claimed Safehouse on a Project Zomboid Server
- How to Repair a Vehicle on a Project Zomboid Server
- How to Configure Vehicle Generation on Your Project Zomboid Server
- How to Increase Item Numbers Limit on Your Project Zomboid Server
- How to Disable Meta-Events on Your Project Zomboid Server
- How to Modify Weapon Damage on Your Project Zomboid Server
- How to Restore a Players Health Using Commands on Your Project Zomboid Server
- How to Configure Claimable Structure Types as Safehouses on Your Project Zomboid Server
- How To Modify the Automatic Expiration of Inactive Safehouse Claims on Your Project Zomboid Server
- Show all articles ( 19 ) Collapse Articles
-
- How To See Your Ping in Project Zomboid
- How to Update Project Zomboid to the Latest Version
- How to Adjust Day Length Settings on Your Project Zomboid Server
- How to Change Starting Skill Points on Your Project Zomboid Server
- How to Disable Zombie Respawn on Project Zomboid
- How to Reset a Character on Your Project Zomboid Server
- How to Enable Debug Mode on Your Project Zomboid Server
- How to Enable Proximity Voice Chat on Your Project Zomboid Server
- How to Fix the Reversion of Changes in Sandbox Options on Your Project Zomboid Server
-
Unturned
- How To Find an Unturned User’s SteamID
- How To Enable Cheats on Your Unturned Server
- How To Change Game Difficulty on Your Unturned Server
- How To Become an Admin on Your Unturned Server
- How To Change the Name, Description and Icon of Your Unturned Server
- How To Configure Auto-Saving on Your Unturned Server
- How To Enable/Disable PVP on Your Unturned Server
- How To Enable Third Person Mode on Your Unturned Server
- How To Ban, Unban, or Kick a Player From Your Unturned Server
- How To Install OpenMod on Your Unturned Server
- How To Make Your Unturned Server Private
- How To Whitelist Your Unturned Server
- How To Whitelist Players on Your Unturned Server
- How To Install Plugins With OpenMod on Your Unturned Server
- How To Install Workshop Mods on Your Unturned Server
- How To Change Your Unturned Server Links
- How To Enable Map Mods on Your Unturned Server
- How To Upload or Download a Savegame on Your Unturned Server
- Show all articles ( 3 ) Collapse Articles
-
Garry's Mod
- How To Change The Name Of Your Garry's Mod Server
- How To Enable RCON on Your Garry’s Mod Server
- How To Enable the In-Game Console on Your Garry’s Mod Client
- How To Give Players Cheats on Your Garry’s Mod Server
- How To Ban or Kick Players on Your Garry’s Mod Server
- How To Add Gamemodes to Your Garry’s Mod Server Using Steam Workshop
- How To Make Your Garry’s Mod Server Private
- How To Make Players Auto-Download Workshop Addons
- How To Add a Steam Workshop Collection to Your Garry’s Mod Server
- How To See the Ping of Your Garry’s Mod Server
- How to Mount Counter-Strike: Source and Team Fortress 2 Content to Your Garry's Mod Server
- How to Add Garry’s Mod Workshop Maps on Your Server
- How To Upload a Custom Map to Your Garry’s Mod Server
- How To Upload a Custom Loading Screen on Your Garry’s Mod Server
- How To Add Custom Startup Parameters to Your Garry’s Mod Server
- How To Install DarkRP to Your Garry’s Mod Server
- How To Install Custom Addons to a Garry’s Mod Server
- Show all articles ( 2 ) Collapse Articles
-
Enshrouded
-
V Rising
-
Left 4 Dead 2
- Articles coming soon
-
Space Engineers
- How to Remove the PCU Limit on Your Space Engineers Server
- How to Change Your Space Engineers Server MOTD
- How to Make Your Space Engineers Server Cross-Platform
- How to Change Your Space Engineers Server Description
- How to Change Your Space Engineers Server Name
- How to Change the Maximum Player Count on Your Space Engineers Server
- How to Change the Gamemode of Your Space Engineers Server
- How to Make Your Space Engineers Server Support Cross Platform
-
Don't Starve Together
-
Core Keeper
-
Web Hosting
-
- Articles coming soon
-
- How to Move a File in Plesk
- How to Rename a File in Plesk
- How to Add a ZeroSSL Certificate In Plesk
- Extending SSL Coverage to Include Mail in Plesk
- How to Upload Files in Plesk
- Creating Email Addresses in Plesk
- Enabling the .htaccess File in Plesk
- How to Create Additional Plesk Users
- How to Create MySQL Databases in Plesk
- How to Create MySQL Users in Plesk
- How to Create Subdomains in Plesk
- How to Extract From a Zip File in Plesk
- How to Force HTTPS in Plesk
- How to Update Your Plesk Profile Password and Email Address
- How to View Disk and Traffic Usage in Plesk
- Managing DNS in Plesk
- Accessing and Creating FTP Users in Plesk
- Accessing Emails Through Webmail in Plesk
- Adding an Addon Domain in Plesk
- Adding an SPF Record in Plesk
- Adding an SSL Certificate in Plesk
- Blocking IP Addresses From Accessing Websites in Plesk
- Changing the PHP Version in Plesk
- Changing the Upload File Size Limit in Plesk
- Setting up Email Forwarding in Plesk
- Understanding and Modifying File Permissions in Plesk
- Show all articles ( 11 ) Collapse Articles
-
- How to Detach and Attach WPToolkit in Plesk
- How to Install a Plugin on WordPress
- How to Install a Theme on WordPress
- How to Upload a Plugin to WordPress
- How to Upload a Theme to WordPress
- How to Log Into WordPress via Plesk
- How to Secure Your WordPress Installation in Plesk
- Installing WordPress in Plesk
-
-
Control Panel
- How to Lock/Unlock a Backup on Your Cybrancee Panel
- How to Automatically Schedule Backups on Your Cybrancee Panel
- How to Delete a Backup on Your Cybrancee Panel
- How to Restore a Backup on Your Cybrance Panel
- How to Create a Backup on Your Cybrancee Panel
- How to Create a Database on Pterodactyl
- How to Easily Upload Folders to Your Cybrancee Panel
- How to Get a Pterodactyl Server IP Address
- How to Configure Schedules in Pterodactyl
- How to Add a Port in Your Cybrancee Panel
- Getting Support With the Pterodactyl Panel
- How to Change Pterodactyl Egg Version
- How to Connect to Pterodactyl Via SFTP
- How to Create a File in Pterodactyl
- How to Move Files in Pterodactyl
- How to Reinstall Your Cybrancee Server
- How to Rename Your Pterodactyl Server
- How to Reset Your Pterodactyl Password
- How to Upload Files Through Pterodactyl
- How to Enable Two-Step Verification on Pterodactyl
- Using Pterodactyl Controls
- What Is CRON Syntax?
- How to Completely Reset Your Cybrancee Server
- Show all articles ( 8 ) Collapse Articles
-
Account
-
- Articles coming soon
-
Domains
-
7 Days to Die
-
Euro Truck Simulator 2
How to Host an Ark: Survival Ascended Server
1. Log In for the First Time
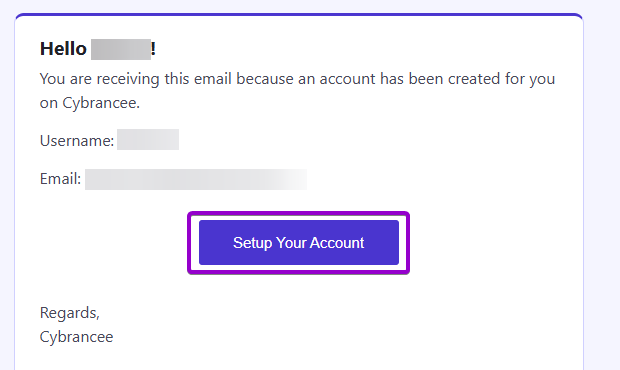
After placing your order on the Cybrancee website, you will receive an email confirming your order as well as an email inviting you to create your panel account. To get access for the first time, you will need to create your panel account.
Select the ‘Setup Your Account’ button.
If you did not receive this email, you can go to panel.cybrancee.com and do a Password Reset from there.
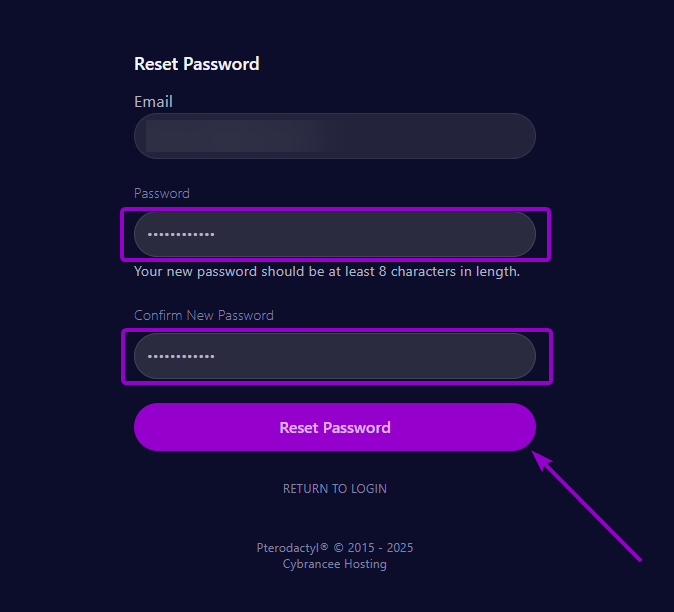
2. Set Your Password
Set your password using the provided fields.
3. Access Your Panel Dashboard
You will be taken back to the login page where you can now log in with your new set of credentials. Once logged in, you will be presented with the Cybrancee Pterodactyl Control Panel. This is where you will manage and configure your game server. From here, select the ‘Manage Server’ button.

4. Get Your Connection Details
By default, the world will have started automatically with the default settings on the latest version of Ark: Survival Ascended. To join your server, you will need to use the in-game server browser. To easily locate your game, change the server name via the startup page.
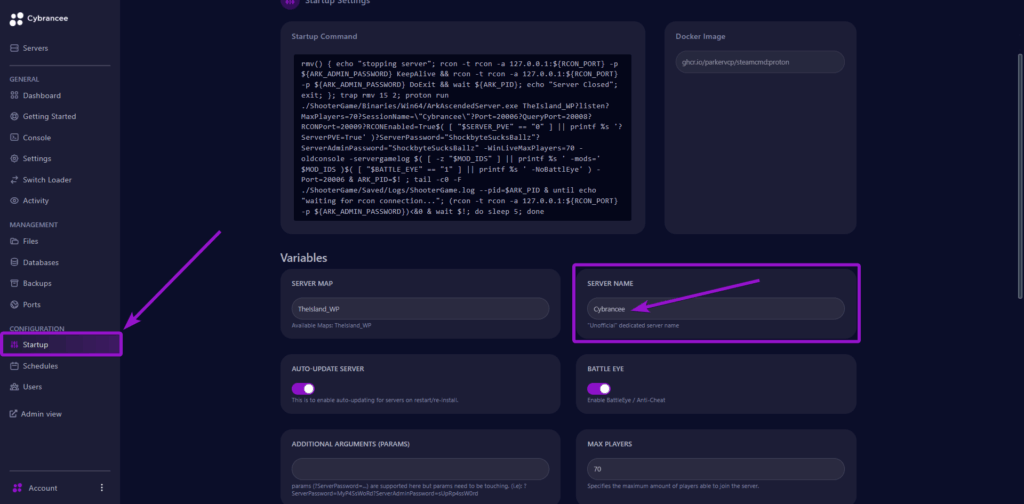
Once the server name has been changed, restart the server.

5. Start the Ark: Survival Ascended Game
Launch the Ark: Survival Ascended game via Steam.
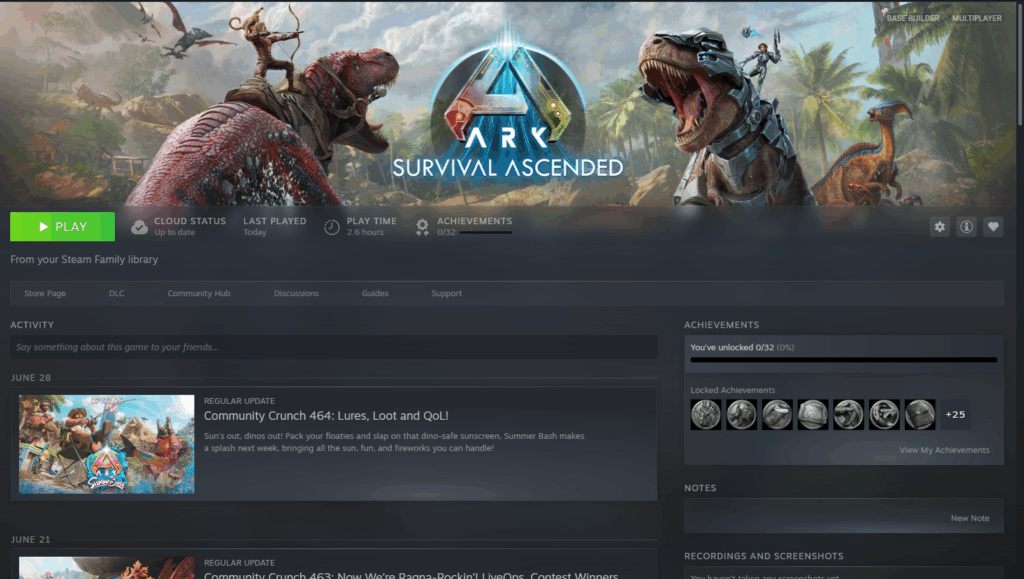
6. Go to the Server Browser
On the game homepage, select the “JOIN GAME” option.

7. Find Your Server
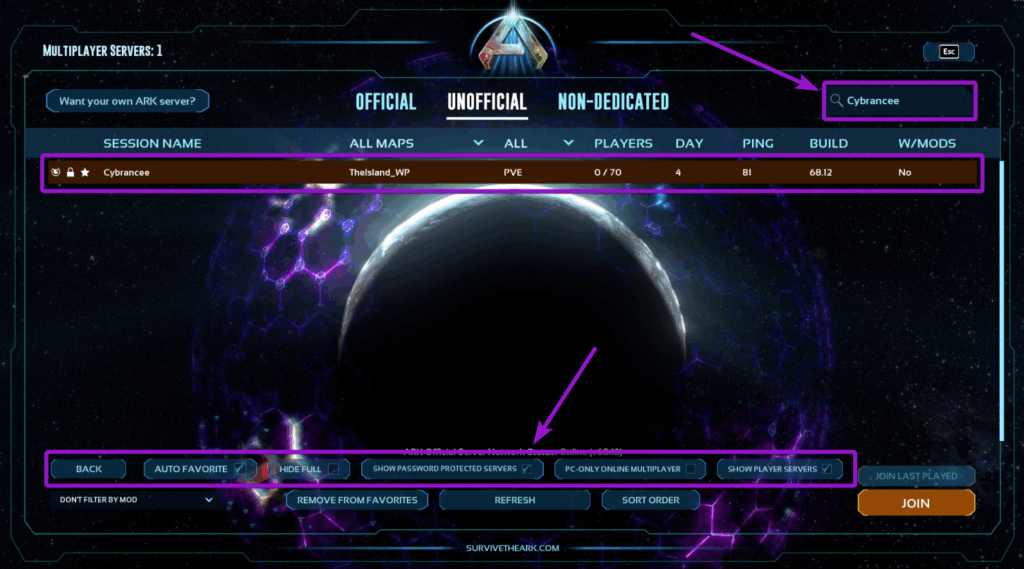
Locate your server by typing in the server name at the top right. You will also need to tick/untick any applicable filters at the bottom.
Your server may not show right away, give it a few minutes for Ark to detect the new server.
8. Join the Server
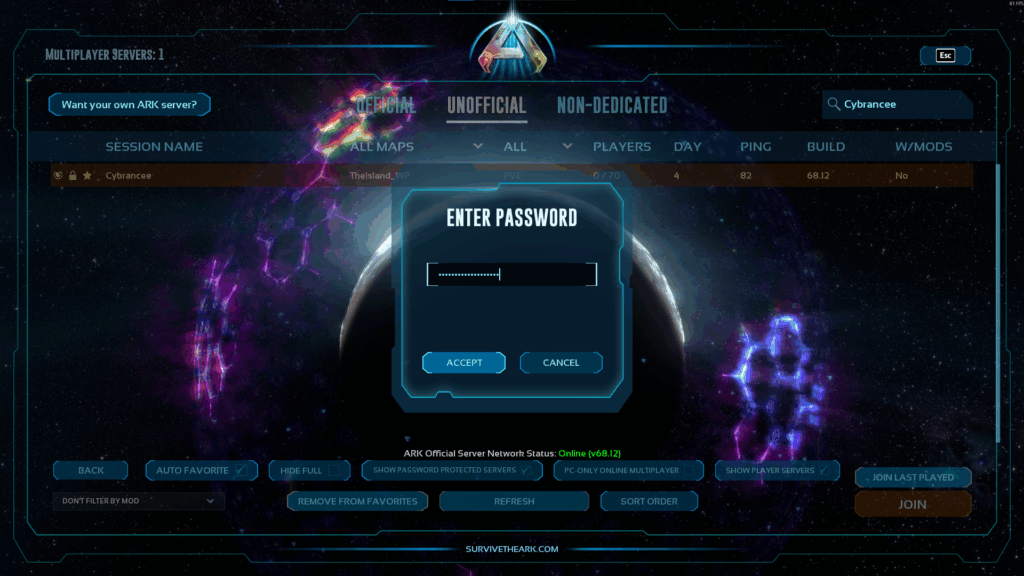
Click the server you wish to join, then select the ‘JOIN’ button at the bottom right. You will need to input a password if you set one on the ‘Startup’ page of the panel.
9. Create Your Character
Customise your character as much as you like, then select ‘CREATE’.

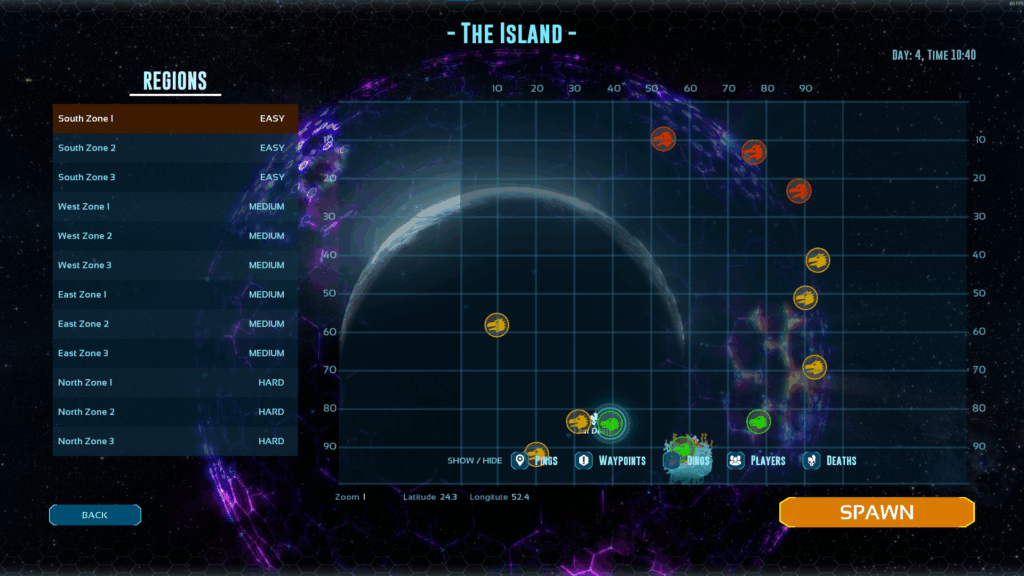
10. Select Your Spawn Region, Then Select ‘SPAWN’.
11. Play Ark: Survival Ascended! 🎉
