
-
Minecraft
-
- How To Allowlist a Minecraft Bedrock Server
- How to Enable Cheats on a Minecraft Bedrock Server
- How to Upload and Use a Custom Map on a Minecraft Server
- How to Disable the Minecraft Server Watchdog
- How to Join a Bedrock Minecraft Server on Xbox
- How To Connect a Domain to Your Minecraft Server (Cloudflare and Plesk)
- How to See Your Additional Minecraft Ports
- How to Download Your Minecraft World
- How to Change the MOTD of Your Minecraft Server
- How to Set a Custom World Seed on Your Minecraft Server
- How to Allow Cracked Versions of Minecraft to Join Your Server
- How to Create a Flat World in Minecraft
- How to Increase/Decrease the Player Slots in Minecraft
- How to Change the View Distance on Your Minecraft Server
- How to Agree to Your Minecraft Server's EULA
- How to Change Your Minecraft Server Version
- How to Change Minecraft Servers Player Slots
- How to Configure RCON on Your Minecraft Server
- Which Version of Java for Your Minecraft Version
- Minecraft Loaders Explained: Forge, Vanilla, Fabric, Paper, Bedrock, NeoForge
- How To Upload a Minecraft World or Transfer a Local Server
- How to Enable Experiments on Minecraft Bedrock
- How to Configure Autosaving in Minecraft
- How to Reset Your Minecraft World
- How to Change the Tick Rate on a Minecraft Server
- How to Move Your Realms World to a Minecraft Server
- How to Change the Mob Spawn Rate on a Minecraft Server
- How To Setup Whitelisting on Your Minecraft Server
- How to Reset World Statistics on Your Minecraft Server
- How to Find and Read Minecraft Crash Logs
- How to Upload an Existing Bedrock World to Your Minecraft Server
- How To Install the Pixelmon Modpack on Your Minecraft Server
- How To Reset a Player’s Data on Your Minecraft Server
- How To Filter Messages on Your Minecraft Server Console
- How To Trim Your Minecraft World Using WorldBorder
- How To Allow Bedrock Breaking, TNT Duping, and Other Exploits in PaperMC Servers
- How To Install Paper Plugins on Your Minecraft Fabric Server
- How To Change Your Minecraft Server Icon
- How To Change the Game Mode to Hardcore on Your Minecraft Server
- How To Create a Hardcore World on Your Minecraft Server
- How To Set Up Automated Broadcast Messages on Your Minecraft Server
- How To Force a Resource Pack on Your Minecraft Server
- How To Install Datapacks on Your Minecraft Server
- How to Enable/Disable doDaylightCycle on Your Minecraft Server
- How to Set an AFK Timeout on Your Minecraft Server
- How to Configure Function Permission Levels on Your Minecraft Server
- How to Enable or Disable IP Address Logging on Your Minecraft Server
- How to Enable the Query Protocol on Your Minecraft Server
- How to Configure Packet Rate Limiting on Your Minecraft Server
- How To Create a Custom Subdomain for Your Minecraft Server
- Show all articles ( 35 ) Collapse Articles
-
- How to Change the Simulation Distance on Your Minecraft Server
- How to Disable Player Advancement Announcements on Minecraft
- How to Set Up a World Border on Minecraft
- How to Disabled/Enable Creeper Explosions in Minecraft
- How to Disabled/Enable TNT in Minecraft
- How to Disable/Enable Fire Spread on Minecraft
- How to Disable the Nether in Minecraft
- How To Enable Command Blocks in Your Minecraft Server
- How to Configure or Disable Spawn Protection for Your Server
- How to Change Your Minecraft Server Gamemode
- How To View the Banlist in Minecraft
- How To Kick, Ban and Unban Players on Your Minecraft Server
- How to Change the Difficulty in Minecraft
- How to Change the Weather in Minecraft
- How to Change the Daylight Cycle in Minecraft
- How to Enable Flying on Your Minecraft Server
- How to Disable the End in Minecraft
- How To Make a Player OP (Operator) in Minecraft
- How to Give Your Minecraft Client More RAM
- How To Set the World Spawn on Your Minecraft Server
- How To Enable Coordinates on Your Minecraft Server
- How to Use NBTExplorer to Edit Minecraft World Data
- How To Edit Your Player Data
- Every Minecraft Cheat Command
- How to Enable or Disable PvP on Your Minecraft Server
- How to Enable or Disable Keep Inventory on Death on Your Minecraft Server
- How to Enable or Disable Mob Griefing on Your Minecraft Server
- How to Change the Player Sleeping Percentage on Your Minecraft Server
- How to Change the Spawn Radius on Your Minecraft Server
- How to Enable or Disable Raids on Your Minecraft Server
- Show all articles ( 15 ) Collapse Articles
-
- How to Improve the Performance of Your Minecraft Server
- How to Reduce RAM Usage on Your Minecraft Server
- How to See Your Ping in Minecraft
- How to Generate a Spark Report
- How To Fix Rubberbanding on a Minecraft Server
- How To Create a Timings Report on Your Minecraft Server
- How To Analyze a Timings Report
- How To Optimize the paper.yml File To Reduce Lag
- How To Optimize the spigot.yml File To Reduce Lag
- How To Trim Your Minecraft World Using WorldBorder
- How To Check the Network Status of a Minecraft Server
- How to Disable Anti-Xray on Your Minecraft Server to Save RAM
- How To Reduce Mob Spawning on Your Minecraft Server
- How to Configure Entity Broadcast Range on Your Minecraft Server
-
- How to Upload Mods to Your Minecraft Server
- How to Change Your Minecraft Server Forge Version
- How to Install GeyserMC on Your Minecraft Server
- How to Upload Forge Modpacks to Your Minecraft Server
- How To Update Modpacks on Your Minecraft Server (Panel or SFTP)
- How To Change the Fabric Version on Your Minecraft Server
- How to Add Simple Voice Chat to Your Minecraft Server
- How to Export Your Modpack to Curseforge
- How to Export Your Modpack to Modrinth
- How to Install 'All the Mods 10' on Your Minecraft Server
- How to Install ‘1.12.2 Pack’ on Your Minecraft Server
- How to Install 'All the Mods 9' on Your Minecraft Server
- How to Install 'SkyFactory' on Your Minecraft Server
- How to Add Addons to Your Minecraft Bedrock Server
- How To Set Up and Run RLCraft on Your Minecraft Server
- How To Install 'Feed The Beast' on Your Minecraft Server
- How to Install ‘Dawncraft’ on Your Minecraft Server
- How to Install MC Eternal on Your Minecraft Server
- How to Install 'FTB Evolution' on Your Minecraft Server
- How to Install and Use Resource Packs on Your Minecraft Server
- How to Read a Spark Report of Your Minecraft Server
- How to Upload Minecraft Plugins (Paper)
- How to Install Prominence II: Hasturian Era on Your Minecraft Server
- How to Use Chunk Generators in Minecraft
- How to Install Better MC on Your Minecraft Server
- How To Export a MultiMC Instance
- How To Create Instances in MultiMC
- How To Install Paper Plugins on Your Minecraft Fabric Server
- How To Set Up a Vote Notification System on Your Minecraft Server
- How To Link Your Discord Server to Your Minecraft Server
- How To Set Up BlueMap on Your Minecraft Server
- How To Install the Cobblemon Modpack on Your Minecraft Server
- How To Install and Set Up an Anti-Cheat (GrimAC) on Your Minecraft Server
- How To Install and Use CoreProtect on Your Minecraft Server (RollBack Griefing)
- How To Get a Live Map for Your Minecraft Server (Dynmap)
- How To Install LuckPerms on Your Minecraft Server
- How to Set Up TAB (Playerlist/Scoreboard) and PlaceholderAPI on Your Minecraft Server
- How To Lock Chests, Doors, and Furnaces on Your Minecraft Server
- How To Set Up Player Playtime Tracking on Your Minecraft Server
- How To Create a Reward Crate System on Your Minecraft Server (CrazyCrates)
- How To Add Custom Enchantments to Your Minecraft Server (ExcellentEnchants)
- How To Create Holographic Text at Your Server Spawn on Your Minecraft Server (DecentHolograms)
- How To Set Up a Skyblock on Your Minecraft Server (BentoBox)
- How To Let Players Chop Down Entire Trees Instantly on Your Minecraft Server (Timber)
- How To Allow Multiple Client Versions To Join Your Minecraft Server
- How To Link Your Minecraft Chat to Discord (DiscordSRV)
- How To Set Up a Player Bounty System on Your Minecraft Server (BetterBounty)
- How To Set Up an Economy System on Your Minecraft Server (EssentialsX and Vault)
- How To Automatically Clear Dropped Items To Reduce Lag (ClearLag) in Minecraft
- How To Restore Player Skins on Your Cracked Minecraft Server (SkinRestorer)
- How To Add Custom Name Tags and Colours on Your Minecraft Server (NametagEditX)
- How To Set Up a Login Password System for Your Minecraft Server (AuthMe Reloaded)
- How To Add Player Jobs to Your Server (Jobs Reborn)
- How To Let Players Sit, Crawl, and Lie Down on Your Minecraft Server (GSit)
- How To Automatically Sort Player Chests on Your Minecraft Server (ChestSort)
- How To Allow Players To Mine Spawners With Silk Touch on Your Minecraft Server (SilkSpawners)
- How To Filter Bad Language and Spam From Your Minecraft Server Chat (ChatControl)
- How to Automatically Replant Crops When Harvesting on Your Minecraft Server (AutoReplant)
- How To Block VPNs, Proxies, and Alt Accounts on Your Minecraft Server (FoxGate AntiVPN)
- How To Create Custom Bosses and Monsters on Your Minecraft Server (MythicMobs)
- How To Install and Use WorldEdit on Your Minecraft Server
- How To Create Multiple Worlds on One Minecraft Server (Multiverse-Core)
- How To Force Bots To Give Their Items and Pills to Human Players in Left 4 Dead 2
- How to Install Fabric API on Your Minecraft Server
- How to Safely Remove Plugins or Mods From Your Minecraft Server
- How to Update Minecraft Plugins Without Losing Configuration Data
- How to Stop X-Ray on Your Minecraft Server
- Show all articles ( 52 ) Collapse Articles
-
- How To Fix: java.lang.NumberFormatException: For input string: "default" in Minecraft Paper
- How to Fix the Getsockopt Error in Minecraft
- How To Fix 'Unknown host' Error in Minecraft
- What Different Join Errors Mean When Joining a Minecraft Server
- How To Fix the ‘The Authentication Servers Are Currently Not Reachable’ Error on a Minecraft Server
- How to Fix the 'Failed to Login: Null' Error on a Minecraft Server
- How to Fix the 'Timed Out' Error on a Minecraft Server
- How to Fix the 'Invalid Session' Error on a Minecraft Server
- How to Fix 'Failed to Verify Username' Error on Your Minecraft Server
- How to Fix the 'Java.net.SocketException' Error on a Minecraft Server
- How To Fix the ‘Chat Disabled Due to Missing Profile Public Key’ Error on Your Minecraft Server
- How to Fix Unable to Access Jarfile on a Minecraft Server
- How to Fix the ‘Invalid or Corrupt Jarfile’ Error on Your Minecraft Server
- How to Fix the ‘Failed to Check Session Lock’ Error on a Minecraft Server
-
Hytale
- How to Change the Server Name on Your Hytale Server
- How to Check Your Hytale Server Logs for Errors
- How To Install Mods on Your Hytale Server
- How to Enable or Disable the Server Whitelist on Your Hytale Server
- How To Add an Admin/Operator to Your Hytale Server
- How To Add Admin UI Mod to Your Hytale Server
- How To Increase the Number of Stackable Items on Your Hytale Server
- How to Assign Moderator or Admin Permissions on Your Hytale Server
- How To Enable or Disable Mob and NPC Spawning on Your Hytale Server
- How to Change the Difficulty on Your Hytale Server
- How to Update Your Hytale Server to the Latest Version
- How To Change the MOTD on Your Hytale Server
- How To Change the Maximum Player Slots on Your Hytale Server
- How to Reset/Regenerate Your Hytale Server World
- How to View the Online Players on Your Hytale Server
- How To Ban and Unban Players on Your Hytale Server
- How to Whitelist Players on Your Hytale Server
- How to Kick a Player From Your Hytale Server
- How to Set a Password on Your Hytale Server
- How to Enable Operators on Your Hytale Server
- How To Add Welcome Messages to Your Hytale Server
- How To Find a Hytale Player’s Username
- How To Configure PvE or PvP Zones on Your Hytale Server
- How to Find a Hytale Player's UUID
- How to Find Offline and Recent Players on Your Hytale Server
- How to Make a New World on Your Hytale Server
- How to Enable or Disable PvP on Your Hytale Server
- How to Enable or Disable Fall Damage on Your Hytale Server
- How to Pause Game Time on Your Hytale Server
- How To Increase the Amount of Mined Ores on Your Hytale Server
- How To Add an Item and Block Identifier to Your Hytale Server
- How to Change the World Seed on Your Hytale Server
- How To Place Torches While Using the Pickaxe in Hytale
- How To Add a Modlist UI to Your Hytale Server
- How To Teleport to Your House on Your Hytale Server
- How To Add a Functional Trash Container to Your Hytale Server
- How To Add Bags to Your Hytale Server
- Controlling NPC and Animal Spawning on Your Hytale Server
- How to Upload and Use a Singleplayer World on Your Hytale Server
- How to Configure Death Drops and Inventory Penalties on Your Hytale Server
- How To Fix Your Hytale Server Not Starting
- How To Change the Server Time/Day-Night Cycle on Your Hytale Server
- How To Reset Inventory When You Die on Your Hytale Server
- How to Reset Player Data on Your Hytale Server
- Show all articles ( 29 ) Collapse Articles
-
Rust
-
- How to Configure the Missile Silo Timer on Your Rust Server
- How to Configure Building Decay on Your Rust Server
- How to Configure Easy Anti-Cheat on Your Rust Server
- How to Configure Team Size on Your Rust Server
- How To Add Server Tags to Your Rust Server
- How to Change the Game Mode on Your Rust Server
- How to Change Your Rust Server Description, Header Image and URL
- How to Change the Name of Your Rust Server
- How to Change the Rust RCON Password
- How To Enable Hardcore Mode on Your Rust Server
- How To Setup Logging for Your Rust Server
- How to Set Up RCON on Your Rust Server
- How to Spawn Trains & Railways on Your Rust Server
- How To Update the Server Header Image on Your Rust Server
- How To Set a Custom Map on Your Rust Server
- How To Configure a Custom Domain for Your Rust Server
- How to Pair the Rust+ Mobile App With Your Server
- How To Point Your Rust Server to a Custom Domain Using Cloudflare
- How to Add Your Rust Server to Favourites
- How To Change Your Rust Server World Size and Seed
- How to List Your Rust Server as a Community Server
- How To Add Custom Chat Emojis on Your Rust Server
- How To Turn On Free Build Mode on Your Rust Server
- How To Configure Your Rust Server for PvE Gameplay
- How To Change Your Rust Server Icon or Logo
- How To Create a Softcore Rust Server
- How To Keep Tea Boosts After Player Death on Your Rust Server
- How To Stop Patrol Helicopters From Fleeing on Your Rust Server
- How To Activate Tutorial Island Mode on Your Rust Server
- How To Add Players to Custom Oxide Groups on Your Rust Server
- How To Change Your Rust Server Era to Medieval or Primitive
- How To Disable Radiation Zones on Your Rust Server
- How To Adjust Hackable Crate Timers on Your Rust Server
- How To Make Your Rust Server Premium
- How To Install the Discord Extension on Your Rust Server
- How to Configure PVP Damage Settings on Your Rust Server
- How to Locate the server.cfg File on Your Rust Server
- How to Disable Building Repair Cooldowns on Your Rust Server
- How to Transfer a Rust Server
- How to Control the Cargo Ship Event on Your Rust Server
- Show all articles ( 25 ) Collapse Articles
-
- How to Connect Centralized Banning to Your Rust Server
- How To Ban/Unban Someone on a Rust Server
- How To Set Administrators on Your Rust Server
- How To Make Your Rust Server Private
- How to See Your Ping in Rust
- How to Manage Time on Your Rust Server
- How to Set Up RCON on Your Rust Server
- How to Use Rust Oxide Permission System
- How to View Active Players on Your Rust Server
- How to Mute or Unmute Players on Your Rust Server
- How to Check Server Join History on Your Rust Server
- How to Use Console Commands for Airdrops on Your Rust Server
- Rust Admin Commands List
- How To Read Rust Error Logs
- Complete Guide to All Rust Debug Camera Commands
- How To Spawn Every Deployable Item on Your Rust Server
- How to Change the Weather Settings on Your Rust Server
- How to Find a User’s SteamID
- Show all articles ( 3 ) Collapse Articles
-
- How to Enable a Whitelist on Your Rust Server
- How to Configure Custom Loading Messages on Your Rust Server
- How To Install Oxide and Oxide Plugins on Your Rust Server
- How to Increase Item Stack Limits in Your Rust Server
- How to Increase Gather Rates in Your Rust Server
- How To Install Carbon and Carbon Plugins on Your Rust Server
- How To Make Your Rust Server Private
- How to Install Harmony Mods on Your Rust Server
- How to Activate Better Loot on Your Rust Server
- How to Set Up Automatic Server Messages on Your Rust Server
- How to Add Custom Kits on Your Rust Server
- How to Update Oxide/Rust on Your Rust Server
- How to Install Vanish Plugin on Your Rust Server
- How to Install Death Notes Plugin on Your Rust Server
- How to Install No Give Notices Plugin on Your Rust Server
- How to Install Quick Smelt Plugin on Your Rust Server
- How to Install Furnace Splitter Plugin on Your Rust Server
- How to Install Copy Paste Plugin on Your Rust Server
- How to Install NTeleportation Plugin on Your Rust Server
- How to Install Admin Radar Plugin on Your Rust Server
- How to Install Backpacks Plugin on Your Rust Server
- How to Install Remover Tool Plugin on Your Rust Server
- How To Adjust Recycler Collection Speed on Your Rust Server
- How to Mute or Unmute Players on Your Rust Server
- Trusted Rust Plugin Websites for Your Server
- How To Activate Instant Crafting on Your Rust Server
- How To Allow Locking of All Vehicles on Your Rust Server
- How To Enable Automatic Building Upgrades on Your Rust Server
- How To Enable Skip Night Voting on Your Rust Server
- How To Add Players to Custom Oxide Groups on Your Rust Server
- How To Add Custom Images to Signs on Your Rust Server
- How To Share Blueprints on Your Rust Server
- How To Install the Chaos Extension to Your Rust Server
- How To Install the Discord Extension on Your Rust Server
- How To View Player Inventories on Your Rust Server
- How to Configure PVP Damage Settings on Your Rust Server
- Show all articles ( 21 ) Collapse Articles
-
- How to Pair the Rust+ Mobile App With Your Server
- How To Setup the CCTV Camera in Rust With Code List
- How to Use the Rust+ App to Manage CCTV Cameras
- How to Set Up Smart Lights Using the Rust+ App
- How To Receive Notifications From Smart Alarms in Rust+
- How To Set Up Custom Radio Stations on Your Rust Server
- How to Connect Smart Alarms in the Rust+ App
- How To Change Your Rust Player Seed
- Complete Guide to All Rust Debug Camera Commands
- How To Spawn Every Deployable Item on Your Rust Server
- How To Adjust Hackable Crate Timers on Your Rust Server
- How To Make Cinematic Animations on Your Rust Server
- How To Record Demos on Your Rust Server
- How to Change the Weather Settings on Your Rust Server
- How to Join a Rust Server
- How to Manually Start the Deep Sea Event on Your Rust Server
- Show all articles ( 1 ) Collapse Articles
-
Valheim
- How To Add Mods to Your Valheim Server
- How to Enable Crossplay Support on Your Valheim Server
- How to Make Your Valheim Server Show on Community Servers
- How to Change Your Valheim World Name
- How to Change Your Valheim Server Name
- How To Upload Your Own World to Your Valheim Server
- How to See/Change Your Valheim Server Password
- How To Change the World Modifiers on Your Valheim Server
- How to Find a User’s SteamID
- How To Be an Admin on Your Valheim Server [+1.0]
- How To Enable a Whitelist for Your Valheim Server
- How To Kick and Ban Players on Your Valheim Server
- How To Connect to Your Valheim Server via Direct IP
- How to Install and Configure ValheimPlus on Your Valheim Server
- How To Install and Configure Epic Loot on Your Valheim Server
- How To Build Custom Mob Drop Tables Using Drop That on Valheim
- How To Install and Configure Better Archery on Your Valheim Server
- How To Roll Back Your Valheim Server to Pre-1.0
- How To Enhance Network Performance and Fix Desync on Your Valheim Server
- How To Recover a Corrupted Valheim World Using .db.old and .fwl.old Files
- How To Install and Configure Valheim Simple Auto Sort on Your Server
- How To Install and Configure Plant Everything on Your Valheim Server
- How To Install and Configure the Clock Mod on Your Valheim Server
- How to Install and Configure the Auto Fuel Mod on Your Valheim Server
- How To Install and Configure the ValheimRAFT Mod on Your Valheim Server
- How To Reset Your Server World on Your Valheim Server
- How to Use Admin Commands on Your Valheim Server
- How To Find Your Valheim Server IP Address
- How To Join or Connect to Your Valheim Server
- Show all articles ( 14 ) Collapse Articles
-
Palworld
-
- How To Make Your Palworld Server a Community Server
- How To Schedule a Palworld Server Restart With Scheduled Tasks
- How To Kick or Ban Players on Your Palworld Server
- How To See Your Ping on Your Palworld Server
- Best Palworld Server Settings for a Community Server
- Best Palworld Server Settings for PvP Servers
- How To Enable PvP on Your Palworld Server
- How To Automatically Clean Up Abandoned Bases on Your Palworld Server
- Palworld Server "Connection Timed Out" (Post-Update)
- How To Configure EXP and Loot Drop Rates on Your Palworld Server
- How to Host 50 Pals in a Single Base on Your Palworld Server
- How To Enable Admin Commands on Your Palworld Server
- How to Switch Palworld to Support Xbox/Gamepass
- How To Enable Crossplay on Your Palworld Server
- How To Become an Admin on Your Palworld Server
- How To Set a Server Password on Your Palworld Server
- How to Set an Admin Password on Your Palworld Server
- How to Change Your Palworld Server Description
- How To Change Your Palworld Server Name
- How To Switch Your Palworld Server To Support Steam
- How to Update a Palworld Server to the Newest Version
- How To Manage Player Visibility and Chat on Your Palworld Server
- How To Enable RCON on Your Palworld Server
- How to Adjust Supply Drop Frequency on Your Palworld Server
- How to Find a User’s SteamID
- How To Track PvP Loot Carried by Players on Your Palworld Server
- How To Enable Crossplay With PS5/Xbox on Your Palworld Server
- How To Update Your Palworld Server to Version 1.0
- How To Upload Your World to Your Palworld Server
- Show all articles ( 14 ) Collapse Articles
-
- How To Change the Difficulty on Your Palworld Server
- How To Edit Your Palworldsettings.ini File
- How To Generate and Apply a Custom WorldOption.sav on Your Palworld Server
- How To Edit the Gathering Rate on Your Palworld Server
- How To Adjust Health Regeneration Speeds on Your Palworld Server
- How To Toggle Character Persistence After Logout on Your Palworld Server
- How To Customize Enemy Loot Drops on Your Palworld Server
- How To Enable/Disable Character Decay on Your Palworld Server
- How To Adjust Equipment Durability Loss on Your Palworld Server
- How To Enable/Disable Item Weight Limits on Your Palworld Server
- How To Customize Day and Night Speed on Your Palworld Server
- How To Reduce Hunger and Sanity Loss on Your Palworld Server
- How To Disable Map Spawn Selection on Your Palworld Server
- How To Adjust Dungeon Respawn Time on Your Palworld Server
- How To Disable Raids on Your Palworld Server
- How To Adjust Pal Egg Hatching Time on Your Palworld Server
- How To Increase Pal Work Speed on Your Palworld Server
- How To Enable the Global Palbox on Your Palworld Server
- How Enable or Disable Predator Pals on Your Palworld Server
- How To Increase Pal Capture Rate on Your Palworld Server
- How To Change Player EXP Rate on Your Palworld Server
- How To Enable Fast Travel From Anywhere on Your Palworld Server
- How To Enable or Disable Friendly Fire on Your Palworld Server
- How To Enable Aim Assist for Controllers on Your Palworld Server
- How To Enable Aim Assist for Keyboard Players on Your Palworld Server
- How To Enable bIsMultiplay on Your Palworld Server
- How To Enable Hardcore Mode on Your Palworld Server
- How To Create a New World on Your Palworld Server
- How To Change the Spawn Rates on Your Palworld Server
- How To Change the Death Penalty on a Palworld Server
- How To Hide Rival Base Borders on Your Palworld Server
- How To Enable Base Defences Against Rival Players on Your Palworld Server
- How to Enable or Disable Manual Spawn Selection on Your Palworld Server
- How To Enable Looting Other Players Death Drops on Your Palworld Server
- How To Enable Permanent Death on Your Palworld Server
- How To Adjust Pal Damage Resistance on Your Palworld Server
- How To Change Player Attack Damage on Your Palworld Server
- How To Adjust Player Damage on Your Palworld Server
- How To Enable Backup Saves on Your Palworld Server
- How To Show Join/Leave Messages on Your Palworld Server
- How To Adjust the Global Building Limit on Your Palworld Server
- How To Adjust the Player Render Distance on Your Palworld Server
- How To Change Player Hunger Rates on Your Palworld Server
- How To Adjust Player Stamina on Your Palworld Server
- How To Change Pal Hunger Rates on Your Palworld Server
- How To Adjust Pal Stamina on Your Palworld Server
- How To Adjust Building Health on Your Palworld Server
- How To Adjust the Death Respawn Timer on Your Palworld Server
- How To Adjust Item Spoilage on Your Palworld Server
- Show all articles ( 34 ) Collapse Articles
-
- How To Unlock the Full World Map on Your Palworld Server
- How To Add Lighting & Shader Mods to Your Palworld Server (Steam and Game Pass)
- How To Add Mods to Your Palworld Server
- How To Install the Enhanced Visuals Mod on Your Palworld Server
- How Remove Mods From Your Palworld Server
- How To Turn Palworld Server Into a Base-Building RTS
- How to Configure a Hardcore Gameplay Mode on Your Palworld Server
- How To Configure a Night-Only Cycle on Your Palworld Server Using WorldOption.sav
-
- Articles coming soon
-
-
Terraria
- How to Upload a World to Your Terraria Server
- How to Update the tModLoader Version
- How To Be an Admin/Owner in TShock
- How to Change the Difficulty for Terraria
- Installing Terraria Mods With tModLoader
- How to Ban or Unban Players From Your Terraria Server
- How To Change the Day/Night Cycle in Terraria
- How to Add a Custom MOTD on Terraria
- How to Change Your Terraria Server Password
- How to Change the Size of Your Terraria Server World
- How To Add a Whitelist to Your Terraria (TShock) Server
- How To Add and Remove Admins From Terraria Your (TShock) Server
- How To Join Your Terraria Server
- How To Enable PVP in Terraria
- How To Create a New Terraria Character (on PC)
- How To Stop a Terraria World From Regenerating After Restarts
- How To Reset Your Terraria Server World
- How To Download Your Terraria Server World
- How To Install & Setup TShock on Your Terraria Server
- How To Change Your Terraria Server Version
- How To Use a Custom World on Your Terraria Server
- How To Setup Terraria Crossplay for PC and Mobile Edition
- How to Find a User’s SteamID
- How To Set Up the 1.4.5 Bigger & Boulder Update on Your Terraria Server
- How To Change the Max Players on Your Terraria Server
- How To Change the PvP Settings on Your Terraria TShock Server
- How To Modify Spawn Protection on Your Terraria TShock Server
- How To Disable Biome Spreading on Your Terraria TShock Server
- How To Set Character Restrictions on Your Terraria TShock Server
- How to Set Up Group Permissions and Prefixes in TShock
- How to Install Calamity Mod on Your Terraria Server
- How to Set a Custom World Seed on Your Terraria Server
- How to Change the Default Port on Your Terraria Server
- How to Enable Hardmode on Your Terraria Server
- How to Enable and Configure Auto-Save on Your Terraria Server
- How to Install Fargo's Mutant Mod on Your Terraria Server
- How to Install Plugins on Your Terraria TShock Server
- How to Manage and Disable Active Mods in tModLoader
- How to Set Up Automated Server Broadcasts in Terraria TShock
- How to Use Item and Tile Ban Lists in Terraria TShock
- How to Fix the "Lost Connection" Error on a Terraria Server
- How to Fix World File Corruption on Your Terraria Server
- How to Install Thorium Mod on Your Terraria Server
- How to Install Magic Storage Mod on Your Terraria Server
- How to Configure MOTD and Server Rules in Terraria TShock
- How to Configure Reserved Slots in Terraria TShock
- How to Configure Server Side Characters in Terraria TShock
- How to Fix Mod Dependency and Load Order Errors in tModLoader
- How to Install Terraria Overhaul Mod on Your Terraria Server
- How To Install The Stars Above Mod on Your Terraria Server
- How to Configure REST WebAPI in Terraria TShock
- How to Set Up Custom Spawn Protection in Terraria TShock
- How to Fix the Out of Memory Crash on a Modded Terraria Server
- Show all articles ( 38 ) Collapse Articles
-
Ark: Survival Evolved
- How to Enable Events on an Ark: Survival Evolved Server
- How to Change the Map on Your Ark: Survival Evolved Server
- How to Install Mods on Your Ark: Survival Evolved Server
- How to Enable Crossplay on an Ark: Survival Evolved Server
- How to Add a Password to Your Ark: Survival Evolved Server
- How to Allow Shared Accounts to Join Your Ark: Survival Evolved Server
- How To Enable Cave Flying in Ark: Survival Evolved
- How To Disable BattlEye Anti-Cheat on Ark: Survival Evolved
- How to Find a User’s SteamID
- How To Add and Remove Admins on Your Ark: Survival Evolved Server
- How To Configure the ‘GameUserSettings.ini’ File on Your Ark Survival Evolved Server
- How to Change the Auto-Save Interval on Your ARK: Survival Evolved Server
- How to Enable the Server Crosshair on Your ARK: Survival Evolved Server
- How to Change the Max Tamed Dinos Limit on Your ARK: Survival Evolved Server
- How To Enable/Disable Admin Command Logging on Your ARK: Survival Evolved Server
- How to Set Max Wild Dino Level on Your ARK: Survival Evolved Server
- How to Change the XP Multiplier on Your ARK: Survival Evolved Server
- How to Enable Player Disconnect Notifications on Your ARK: Survival Evolved Server
- How to Enable Player Join Notifications on Your ARK: Survival Evolved Server
- How to Enable Player Map Locations on Your ARK: Survival Evolved Server
- How to Change the Max Structures in Range Limit on Your ARK: Survival Evolved Server
- How to Change the Resource Respawn Radius on Your ARK: Survival Evolved Server
- How to Change the Idle Player Kick Timer on Your ARK: Survival Evolved Server
- How to Change the Multiplayer Tether Distance on Your ARK: Survival Evolved Server
- How to Change the Global Platform Saddles Limit on Your ARK: Survival Evolved Server
- How to Enable Third-Person Perspective on Your ARK: Survival Evolved Server
- How to Change the Platform Max Structures Limit on Your ARK: Survival Evolved Server
- How to Install the ARK Quality of Life Forges Mod on Your ARK: Survival Evolved Server
- How to Adjust Harvesting and Gathering Rate on Your ARK: Survival Evolved Server
- How to Set Up RCON for Remote ARK Server Management
- How to Set Up a Cluster Server (Cross-ARK Data Transfer)
- How to Speed Up Breeding, Egg Hatching, and Maturation Rates on Your ARK: Survival Evolved Server
- How to Auto-Unlock Engrams as Players Level Up on Your ARK: Survival Evolved Server
- How to Adjust Taming Speed on Your ARK: Survival Evolved Server
- Show all articles ( 19 ) Collapse Articles
-
DayZ
-
- How to Connect to Your DayZ Server
- How to Edit Types.xml on Your DayZ Server
- How to Set Admin Password / RCON Password on Your DayZ Server
- How to Change the Server Name on a DayZ Server
- How to Change the Max Players on a DayZ Server
- How to Add a Server Password to Your DayZ Server
- How to Change the Map on a DayZ Server
- How to Install a Custom Map on Your DayZ Server
- How to Change Weather Settings on Your DayZ Server
- How to Change Day and Night Cycle on Your DayZ Server
- How to Configure Your DayZ Server (serverDZ.cfg Explained)
- How to Set a Message of the Day (MOTD) on Your DayZ Server
- How To Identify a Player’s DayZ Identity ID
- How to Edit Animal Spawns on Your DayZ Server
-
- How To Install Mods on Your DayZ Server
- How to Install CF & VPPAdminTools on Your DayZ Server
- How to Fix Mods Not Loading on Your DayZ Server
- How to Install Expansion Mod on Your DayZ Server
- How to Install DayZ Expansion Vehicles
- How to Install a Custom Map on Your DayZ Server
- How to Install DayZ Expansion AI
- How to Disable Vehicle Damage in DayZ
- How to Configure DayZ Expansion Vehicles
- How to Configure DayZ Expansion Settings
- How to Configure DayZ Expansion AI
- How To Safely Remove a Mod From a DayZ Server
- What Is VPPAdminTools and How Does It Work in DayZ?
- How To Fix Mod Version Mismatch on Your DayZ Server
-
- How to Change Stamina Settings on Your DayZ Server
- How to Change Weather Settings on Your DayZ Server
- How to Change Day and Night Cycle on Your DayZ Server
- How to Enable or Disable Base Damage on Your DayZ Server
- How to Adjust Zombie Spawn Rates on Your DayZ Server
- How to Customize Loot Spawns on Your DayZ Server
- How to Increase Inventory Weight Limits on Your DayZ Server
- How to Add Custom Loot Areas to Your Map on Your DayZ Server
- How to Increase Helicopter Crash Sites on Your DayZ Server
- How Food, Water & Temperature Work on Your DayZ Server
- How to Change Player Spawn Gear on Your DayZ Server
-
Satisfactory
- How to Mod Your Satisfactory Server
- How to Join Your Satisfactory Server
- How To Add a Password to Your Satisfactory Server
- How To Adjust Your Satisfactory Server Settings
- How to Access the Ingame Console of Satisfactory
- How To Change Max Players on Your Satisfactory Server
- How To See Your Ping on Your Satisfactory Server
- How To Change the Server Name on Your Satisfactory Server
- How To Disable Auto-Pause on Your Satisfactory Server
- How to Unclaim Your Satisfactory Server
- How To Change or Reset the Admin Password on a Satisfactory Server
- How To Change the Name of Your Satisfactory World
- How To Download a Save From a Satisfactory Server
- How To Transfer a Single-Player Satisfactory Save to a Dedicated Server
- How To Make Your Satisfactory Server Private
- How To Upload Blueprints to a Satisfactory Server
- How to Fix Connection Timed Out on a Satisfactory Server
- How To Change the Starting Area on a Satisfactory Server
- How to Connect to Your Satisfactory Server Using IP and Port
- How to Find Your Satisfactory Server on the In-Game Server Browser
- How To Get Administrative Privileges in Satisfactory
- Satisfactory Command Cheatsheet
- How to Schedule Weekly Wipes or Seasonal Resets on Your Satisfactory Server
- Security Tips for a Public Satisfactory Server
- How to Find a User’s SteamID
- How to Create Additional Save Slots on Your Satisfactory Server
- How To Switch Your Satisfactory Server Between Early Access and Experimental Versions
- How To Automate Blueprint Distribution to All Players on Your Satisfactory Server
- Show all articles ( 13 ) Collapse Articles
-
Project Zomboid
-
- How To Setup RCON for Your Project Zomboid Server
- How To Whitelist a Project Zomboid Server
- How to Make Your Project Zomboid Server Private
- How To Set the Spawn Point of Your Project Zomboid Server
- How To Change the Name and Description of Your Project Zomboid Server
- How To Apply a Sandbox Preset on a Project Zomboid Server
- How To Become an Admin on Your Project Zomboid Server (B41/B42)
- How To Enable the MiniMap on Your Project Zomboid Server (B41/B42)
- How to Adjust Your Project Zomboid Server Settings
- How to Add a Password to a Project Zomboid Server
- How To Locate Your Project Zomboid Server Crash Logs
- How To Make Project Zomboid Servers Public
- How Reveal the Map on Your Project Zomboid Server (B41/B42)
- How to Configure Zombie Hearing and Vision Range on Your Project Zomboid Server
- How to Disable or Configure the Helicopter Event in Your Project Zomboid Server
- How To Enable and Configure the Starter Kit on Your Project Zomboid Server
- How to Enable Trash Containers Functionality on Your Project Zomboid Server
- How to Configure Vehicle Speed Limits on Your Project Zomboid Server
- How to Enable Safehouse Claim on Your Project Zomboid Server
- How to Enable Automatic Cleanup of Dropped Items on Your Project Zomboid Server (B41/B42)
- How to View Players Skill Progression Logs on Your Project Zomboid Server
- How To Fix the ‘Failed To Download Map From Server’ Error on Your Project Zomboid Server
- How to Fix the Reversion of Changes in Sandbox Options on Your Project Zomboid Server
- How to Configure Automatic Restarts on Your Project Zomboid Server
- How to Set Up Automatic Server Messages on Your Project Zomboid Server
- Restoring Electricity and Water on Your Project Zomboid Server
- How To Link Discord With Your Project Zomboid Server (Build 41 and Build 42)
- How To Install Mods on Your Project Zomboid Server (Build 42)
- How To Change Presets on Your Project Zomboid Server (Build 42)
- How To Fix "No Space Left on Device" on Your Project Zomboid Server
- How To Enable/Disable Steam Relay on a Project Zomboid Server (B41/B42)
- How to Change Starting Skill Points on Your Project Zomboid Server (B41/B42)
- How To Upload Your World to Your Project Zomboid Server (B41/B42)
- How To Create Custom Roles on Your Project Zomboid Server (Build 42)
- How To Change the Seed on Your Project Zomboid Server (B41/B42)
- How To Enable Loot Respawn on Your Project Zomboid Server
- How To Enable MultiHit on Your Project Zomboid Server (B41/B42)
- Show all articles ( 22 ) Collapse Articles
-
- How To Access the Admin Panel on a Project Zomboid Server (B41/B42)
- Managing User Access Levels in Project Zomboid
- Project Zomboid Admin Panel Options (Build 41)
- How To Spawn Items and Vehicles on a Project Zomboid Server
- How To Teleport on a Project Zomboid Server
- How To Kick or Ban a Player From Your Project Zomboid Server
- How To Change the Zombie Spawn Rates on Your Project Zomboid Server
- How To Display Players on the Map on a Project Zomboid Server (B41/B42)
- How To Change Playstyle on Your Project Zomboid Server
- How to Give Yourself XP Levels in Project Zomboid
- How to Get an Item ID on Your Project Zomboid Server
- How to View Other Players Inventories on Your Project Zomboid Server
- How to Remove Large Amounts of Zombie Corpses on Your Project Zomboid Server (B41/B42)
- How to Copy Structures/Tiles on Your Project Zomboid Server
- How to Modify Item/Object Properties on Your Project Zomboid Server
- How to Expand a Safezone Size on Your Project Zomboid Server
- How to Spawn Zombie Hordes on Your Project Zomboid Server
- How to Create PVP-Free Zones on Your Project Zomboid Server
- How to Disable Zombie Virus Infection on Your Project Zomboid Server
- How to Enable or Disable Fire Spread Mechanics on Your Project Zomboid Server
- How to Enable or Disable Sleep on Your Project Zomboid Server (B41/B42)
- How to Manually Regenerate Loot in a Container in Your Project Zomboid Server
- How to Enable or Disable PVP on Your Project Zomboid Server
- How to Enable or Disable Sledgehammer Usage on Your Project Zomboid Server
- How to Change How Often Your Project Zomboid Server Saves
- How to View the Designated Area of a Claimed Safehouse on a Project Zomboid Server
- How to Repair a Vehicle on a Project Zomboid Server
- How to Configure Vehicle Generation on Your Project Zomboid Server
- How to Increase Item Numbers Limit on Your Project Zomboid Server
- How to Disable Meta-Events on Your Project Zomboid Server
- How to Modify Weapon Damage on Your Project Zomboid Server
- How to Restore a Players Health Using Commands on Your Project Zomboid Server (Build 41)
- How to Configure Claimable Structure Types as Safehouses on Your Project Zomboid Server
- How To Modify the Automatic Expiration of Inactive Safehouse Claims on Your Project Zomboid Server
- How to Find a Player Steam ID on Your Project Zomboid Server
- How To Modify the Erosion Growth in Your Project Zomboid Server
- How To Modify the Durability of Player-Built Structures on Your Project Zomboid Server
- How to Configure the Number of Accounts a User Can Create to Join Your Project Zomboid Server
- How To Configure the Hunger and Thirst Rate of Players on Your Project Zomboid Server
- How To Add or Remove Traits From an Already Created Character on a Project Zomboid Server
- How To Set Up Extreme Weather on Your Project Zomboid Server
- How To Enable 'Destroy Mode' on Your Project Zomboid Server (Build 42)
- How to Find a User’s SteamID
- How To Reset a User’s Password on Your Project Zomboid Server
- Show all articles ( 29 ) Collapse Articles
-
- How To See Your Ping in Project Zomboid (B41/B42)
- How to Update Project Zomboid to the Latest Version
- How to Adjust Day Length Settings on Your Project Zomboid Server (B41/B42)
- How to Disable Zombie Respawn on Project Zomboid
- How to Reset a Character on Your Project Zomboid Server
- How to Enable Debug Mode on Your Project Zomboid Server (B41/B42)
- How To Enable Proximity Voice Chat on Project Zomboid (B41/B42)
- How to Fix the Reversion of Changes in Sandbox Options on Your Project Zomboid Server
- How To Remove Mods From Your Project Zomboid Server
-
Factorio
- How To Add a Password to a Factorio Server
- How To Add an Admin on Your Factorio Server
- How To Change the Scenario on Your Factorio Server
- How To Change the Difficulty on Your Factorio Server
- How To Create a New Save on Your Factorio Server
- How To Display Your Factorio Server on the Public Server List
- How to Find a User’s SteamID
- How To Enable Peaceful Mode on Your Factorio Server
- How To Keep Your Factorio Server Running With 0 Active Players
- How to Set Up an Offline Version of Your Factorio Server
- How to Whitelist Players on Your Factorio Server
- How to Upload a Single-Player World to Your Factorio Server
-
Unturned
- How To Find an Unturned User’s SteamID
- How To Enable Cheats on Your Unturned Server
- How To Change Game Difficulty on Your Unturned Server
- How To Become an Admin on Your Unturned Server
- How To Configure Auto-Saving on Your Unturned Server
- How To Enable/Disable PVP on Your Unturned Server
- How To Enable Third Person Mode on Your Unturned Server
- How To Ban, Unban, or Kick a Player From Your Unturned Server
- How To Install OpenMod and Plugins on Your Unturned Server
- How To Make Your Unturned Server Private
- How To Whitelist Your Unturned Server
- How To Whitelist Players on Your Unturned Server
- How To Install Workshop Mods on Your Unturned Server
- How To Enable Map Mods on Your Unturned Server
- How To Upload or Download a Savegame on Your Unturned Server
- How to Find a User’s SteamID
- How To Change the Map of Your Unturned Server
- How To Install RocketMod on Your Unturned Server
- How To Change the Name, Description and Icon of Your Unturned Server
- How To Change Your Unturned Server Links
- Show all articles ( 5 ) Collapse Articles
-
Garry's Mod
- How To Change the Name of Your Garry's Mod Server
- How To Enable RCON on Your Garry’s Mod Server
- How To Enable the In-Game Console on Your Garry’s Mod Client
- How To Enable Cheats on Your Garry’s Mod Server
- How To Ban or Kick Players on Your Garry’s Mod Server
- How To Add Gamemodes to Your Garry’s Mod Server Using Steam Workshop
- How To Make Your Garry’s Mod Server Private
- How To Make Players Auto-Download Workshop Addons
- How To Add a Steam Workshop Collection to Your Garry’s Mod Server
- How To See the Ping of Your Garry’s Mod Server
- How to Mount Counter-Strike: Source and Team Fortress 2 Content to Your Garry's Mod Server
- How to Add Garry’s Mod Workshop Maps on Your Server
- How To Upload a Custom Map to Your Garry’s Mod Server
- How To Upload a Custom Loading Screen on Your Garry’s Mod Server
- How To Add Custom Startup Parameters to Your Garry’s Mod Server
- How To Install DarkRP to Your Garry’s Mod Server
- How To Install Custom Addons to a Garry’s Mod Server
- How to Find a User’s SteamID
- Show all articles ( 3 ) Collapse Articles
-
Enshrouded
- How To Set a Password on an Enshrouded Server
- How To Change the Max Players on Your Enshrouded Server
- How to Change Your Server Name on Your Enshrouded Server
- How to Find a User’s SteamID
- How To Change the Crafting Speed on Your Enshrouded Server
- How To Change the Day Length on Your Enshrouded Server
- How To Change the Difficulty on Your Enshrouded Server
- How To Change the Enemy Settings on Your Enshrouded Server
- How To Change the Food and Hunger Settings on Your Enshrouded Server
- How To Change the Gather Rate on Your Enshrouded Server
- How To Create a New World on Your Enshrouded Server
- How To Change the Experience Gain on Your Enshrouded Server
- How To Download ArvronChronozon's Storehouse World for Enshrouded
- How To Disable Death Penalties on Your Enshrouded Server
- How To Download a Save to Singleplayer From Your Enshrouded Server
- How To Switch Between Proximity and Global Voice Chat on Your Enshrouded Server
- How To Enable or Disable Text and Voice Chat on Your Enshrouded Server
- How To Adjust Perk Point Costs on Your Enshrouded Server
- How To Adjust Fishing Difficulty on Your Enshrouded Server
- How To Adjust Player Health on Your Enshrouded Server
- How To Adjust Player Mana on Your Enshrouded Server
- How To Update Your Enshrouded Server to Version 1.0
- Show all articles ( 7 ) Collapse Articles
-
7 Days to Die
- How to Find a User’s SteamID
- How To Change the Difficulty on Your 7 Days To Die Server
- How To Add and Remove Admins on Your 7 Days To Die Server
- How To Change the Jar Refund Settings on Your 7 Days To Die Server
- How To Add a URL to Your 7 Days To Die Server
- How To Change the Map on Your 7 Days To Die Server
- How To Change the PvP Settings on Your 7 Days To Die Server
- How To Change the Server Visibility on Your 7 Days To Die Server
- How To Change the Storm Frequency on Your 7 Days To Die Server
- How To Change the Server Description on Your 7 Days To Die Server
- How To Disable Anti-Cheat on Your 7 Days To Die Server
- How To Disable Biome Progression on Your 7 Days To Die Server
- How To Change the Password for Your 7 Days to Die Server
- How To Kick or Ban Players on Your 7 Days to Die Server
- How To Remove the Death XP Penalty on Your 7 Days To Die Server
- How To Restart a Map on Your 7 Days To Die Server
- How To Upload a World to Your 7 Days To Die Server
- How To Download a Save From Your 7 Days To Die Server
- How To Enable Cheats on Your 7 Days To Die Server
- How To Install Beta Branches on Your 7 Days To Die Server
- How To Install an Overhaul Mod on Your 7 Days To Die Server
- How To Update to the Latest Experimental on Your 7 Days To Die Server
- How To Set Up Twitch Integration on Your 7 Days To Die Server
- How To Install Custom Prefabs on Your 7 Days To Die Server
- How To Install Mods on Your 7 Days To Die Server
- How To Spawn Near Players on Your 7 Days To Die Server
- How To Use a Randomly Generated World on Your 7 Days To Die Server
- How To Run Crossplay on Your 7 Days To Die Server
- How To Reset the Player Data on Your 7 Days To Die Server
- How To Find a Player's EOS ID on Your 7 Days to Die Server
- How To Change the Blood Moon Frequency on Your 7 Days To Die Server
- How To Change Zombie Speed Settings on Your 7 Days To Die Server
- How To Change Day and Night Length on Your 7 Days To Die Server
- How To Change Drop on Death Settings on Your 7 Days To Die Server
- How To Change Loot Respawn Times on Your 7 Days To Die Server
- How To Change Air Drop Frequency on Your 7 Days To Die Server
- How To Change Player XP Multipliers on Your 7 Days To Die Server
- How To Change Land Claim Block Settings on Your 7 Days To Die Server
- How To Enable Chunk Reset on Your 7 Days To Die Server
- How To Change the Max Player Limit on Your 7 Days To Die Server
- How To Change Max Spawned Zombies on Your 7 Days To Die Server
- How To Change Block Damage Settings on Your 7 Days To Die Server
- How To Change Loot Abundance on Your 7 Days To Die Server
- How To Enable Air Drop Markers on Your 7 Days To Die Server
- How To Change Blood Moon Enemy Count on Your 7 Days To Die Server
- How To Disable Enemy Spawning on Your 7 Days To Die Server
- How To Change Max Spawned Animals on Your 7 Days To Die Server
- How To Change the Blood Moon Warning Time on Your 7 Days To Die Server
- How To Change Player Safe Zone Settings on Your 7 Days To Die Server
- How To Enable Persistent Player Profiles on Your 7 Days To Die Server
- How To Change the Max View Distance on Your 7 Days To Die Server
- How To Change the Welcome Message on Your 7 Days To Die Server
- Show all articles ( 37 ) Collapse Articles
-
V Rising
- How to Find a User’s SteamID
- How to Change the Password of Your V Rising Server
- How To Change Your V Rising Server Game Mode (PvE, PvP, DuoPvP Etc…)
- How to Update Your V Rising Server
- How to Change the Name of Your V Rising Server
- How to Change the Server Description of Your V Rising Server
- How to Change the Maximum Player Limit of Your V Rising Server
- How to Change the SERVER FPS Limit of Your V Rising Server
- How to Enable Cheats / Admin Commands on Your V Rising Server
- How To Make Your V Rising Server Public or Private via Startup
- How To Make Your V Rising Server Public or Private via ServerHostSettings.json
- How to Restore Your V Rising Server
- How to Change the Day/Night Cycle Speed on Your V Rising Server
- How to Reset Your V Rising Server World
- How to Disable Castle Decay on Your V Rising Server
- How to Increase Resource Gathering Rates on Your V Rising Server
- How to Change the Blood Drain Rate on Your V Rising Server
- How To Ban and Unban Players on Your V Rising Server
- How to Allow All Waypoints to Be Unlocked on Your V Rising Server
- How to Allow Items to Be Teleported on Your V Rising Server
- How to Enable Free Castle Claiming on Your V Rising Server
- How to Change the Difficulty on Your V Rising Server
- How to Set Castle Limits on Your V Rising Server
- How to Reduce Blood Essence Drain on Your V Rising Server
- How to Set PvP Time Windows (Raid Hours) on Your V Rising Server
- How to Enable Full Loot PvP on Your V Rising Server
- How to Change Clan Size on Your V Rising Server
- How to Adjust Sun Damage on Your V Rising Server
- How to Adjust Player and Enemy Damage on Your V Rising Server
- How to Enable Global Chat on Your V Rising Server
- How to Increase Inventory Stack Sizes on Your V Rising Server
- How to Keep Inventory on Death on Your V Rising Server
- How to Increase Blood Essence Yield on Your V Rising Server
- How To Change the Auto-Save Interval on Your V Rising Server
- How To Set the Number of Auto-Save Slots on Your V Rising Server
- How To Enable RCON on Your V Rising Server Using Startup Variables
- How To Connect to Your V Rising Server via Direct Connect
- How To Enable Secure Mode on Your V Rising Server via ServerHostSettings.json
- How To Change the Save Name on Your V Rising Server via ServerHostSettings.json
- How To Enable Secure Mode on Your V Rising Server Using Startup Variables
- How To Adjust Equipment Durability Drain on Your V Rising Server
- How To Adjust Crafting Costs on Your V Rising Server
- How To Enable RCON on Your V Rising Server Using ServerHostSettings.json
- How To Change the Query Port on Your V Rising Server via ServerHostSettings.json
- How To Set Siege Weapon Health on Your V Rising Server
- How To Configure the Castle Damage Mode on Your V Rising Server
- How To Adjust Servant Convert Rate on Your V Rising Server
- How To Adjust Recipe Costs on Your V Rising Server
- How To Change the Building Cost Modifier on Your V Rising Server
- How To Adjust Equipment Stats on Your V Rising Server
- How To Adjust the Maximum Castle Floor Limit on Your V Rising Server
- How To Adjust the Castle Heart Damage Mode on Your V Rising Server
- How To Adjust Player Max Health on Your V Rising Server
- How To View All Connected Players on Your V Rising Server
- How To Remove Admin Access From a Player on Your V Rising Server
- How To Monitor Resource Usage on Your V Rising Server
- How To Set the Maximum Number of Admins on Your V Rising Server
- How To Kick a Player via Console on Your V Rising Server
- How To Use In-Game Admin Commands on Your V Rising Server
- How To Download Your V Rising Server Save Files
- How To Restart Your V Rising Server From the Console
- Show all articles ( 46 ) Collapse Articles
-
Left 4 Dead 2
-
- How To Change the Difficulty on Your Left 4 Dead 2 Server
- How To Change Your Left 4 Dead 2 Game Mode
- How To Configure Your Left 4 Dead 2 Server
- How To Create a Custom MOTD (Message of the Day) in Left 4 Dead 2
- How To Disable or Customise Friendly Fire Damage on Your Left 4 Dead 2 Server
- How To Increase the Max Player Limit (8+ Players) on Your Left 4 Dead 2 Server
- How To Change the Server Tickrate on Your Left 4 Dead 2 Server
- How To Adjust Zombie Mob Sizes on Your Left 4 Dead 2 Server
- How To Set a Custom Host Banner on Your Left 4 Dead 2 Server
- How To Enable Cheats on Your Left 4 Dead 2 Server
- How To Give Survivors More Health or Speed on Your Left 4 Dead 2 Server
- How To Enable “All-Talk” Voice Chat on Your Left 4 Dead 2 Server
- How To Restrict Votekicking to Admins Only on Your Left 4 Dead 2 Server
- How To Reduce Server Lag and Ping Spikes on Your Left 4 Dead 2 Server
- How to Password Protect and Hide Your Left 4 Dead 2 Server
- How To Disable Survivor Bot Spawns on Your Left 4 Dead 2 Server
- How To Turn On the “Realism” Modifier for Any Campaign in Left 4 Dead 2
- How To Host “Last Man on Earth” on Your Left 4 Dead 2 Server
- How To Enable Infinite Ammo Without Enabling Cheats in Your Left 4 Dead 2 Server
- How To Change Your Left 4 Dead 2 Server’s Matchmaking Region
- How to Enable "Headshots Only" (CO-OP Only) Mode in Your Left 4 Dead 2 Server
- How To Disable Car Alarms (Panic Events) on Your Left 4 Dead 2 Server
- How To Change the Special Infected Spawn Limits on Your Left 4 Dead 2 Server
- How To Force a Specific Campaign To Load on Server Startup in Left 4 Dead 2
- How To Adjust the Tank’s Health on Your Left 4 Dead 2 Server
- How To Completely Disable Tank and Witch Spawns on Your Left 4 Dead 2 Server
- How To Completely Disable In-Game Voice Chat on Your Left 4 Dead 2 Server
- How To Stop Players From Downloading Server Files on Your Left 4 Dead 2 Server
- How To Change the First Aid Kit Healing Speed on Your Left 4 Dead 2 Server
- How To Change the Gravity on Your Left 4 Dead 2 Server
- Show all articles ( 15 ) Collapse Articles
-
- How To Install SourceMod on Your Left 4 Dead 2 Server
- How To Install MetaMod on Your Left 4 Dead 2 Server
- How To Install an AFK Manager on Your Left 4 Dead 2 Server
- How To Enable “Vampirism” for Survivors on Your Left 4 Dead 2 Server
- How To Add a Jetpack Plugin to Your Left 4 Dead 2 Server
- How To Spawn Upgrade Boxes Everywhere on Your Left 4 Dead 2 Server
- How To Let the Charger Steer While Charging on Your Left 4 Dead 2 Server
- How To Add a Weapon Menu to Your Left 4 Dead 2 Server
- How To Enable “Drop Weapon” Functionality on Your Left 4 Dead 2 Server
- How To Enable Crawling While Incapacitated in Your Left 4 Dead 2 Server
- How To Add a Character Select Menu to Your Left 4 Dead 2 Server
- How To Enable Third-Person Mode for Survivors in Your Left 4 Dead 2 Server
- How To Let Players Control the Witch on Your Left 4 Dead 2 Server
- How to Auto-Revive Incapacitated Survivors on Your Left 4 Dead 2 Server
- How To Install Custom Campaigns (Add-On Maps) on Your Left 4 Dead 2 Server
- How To Enable Regenerative Healing on Your Left 4 Dead 2 Server
- How To Improve Survivor Bot AI on Your Left 4 Dead 2 Server
- How To Add Floating Boss Health Bars in Your Left 4 Dead 2 Server
- How To Lock the Safe Room Door Until All Players Are Ready on Your Left 4 Dead 2 Server
- How To Add an End-of-Campaign Map Voting Menu on Your Left 4 Dead 2 Server
- How To Spawn Melee Weapons in Every Starting Saferoom on Your Left 4 Dead 2 Server
- How To Add an Economy Store System for Buying Weapons and Perks on Your Left 4 Dead 2 Server
- How To Set Up Custom Chat Colors and Admin Tags on Your Left 4 Dead 2 Server
- How To Set Up Reserved Slots for VIPs and Admins on Your Left 4 Dead 2 Server
- How To Unlock Hidden CS:S Weapons on Your Left 4 Dead 2 Server
- How To Let Survivors Drop Their Secondary Weapons Upon Death on Your Left 4 Dead 2 Server
- How To Enable Auto-Bhop (Bunnyhopping) for Players on Your Left 4 Dead 2 Server
- How To Enable Special Infected Bots in Left 4 Dead 2 Versus Mode
- Show all articles ( 13 ) Collapse Articles
-
- How To Fix “Server Enforcing Consistency” Error on Your Left 4 Dead 2 Server
- How To Fix the “Steam Validation Rejected” Error on Your Left 4 Dead 2 Server
- How To Fix the “Disconnect: Client Timed Out” Error in Left 4 Dead 2
- How To Fix the “Host_Error: String Table Dictionary” Error When Loading Custom Maps in Left 4 Dead 2
- How To Fix “STEAM Auth Ticket Has Been Cancelled” Errors on Your Left 4 Dead 2 Server
- How To Fix the “Unable To Load Authentication Library” Error on Your Left 4 Dead 2 Server
-
Squad
- How to Find a User’s SteamID
- How to Exclude Factions on Your Squad Server
- How To Enable/Disable Team Switching on a Squad Server
- How to Set the Layer Map Rotation on Your Squad Server
- How to Set Up RCON on Your Squad Server
- How to Enable Server Demo Recording on Your Squad Server
- How to Advertise Your Squad Server on the Public Server List
- How to Configure Reserved Slots on Your Squad Server
- How to Set Up the MOTD on Your Squad Server
- How to Add Admins on Your Squad Server
- How to Ban/Unban a Player on Your Squad Server
- How to Set Up Automatic Broadcast Messages on Your Squad Server
- How to Configure the Public Queue Limit on Your Squad Server
- How to Set Maximum Player Slots on Your Squad Server
- How to Enforce Automatic Team Balance on Your Squad Server
- How to Change Your Squad Server Name
- Show all articles ( 1 ) Collapse Articles
-
Conan Exiles
- How to Find a User’s SteamID
- How To Keep Your Inventory on Death in Conan Exiles
- How To Change the XP Multiplier To Level Up Faster on Your Conan Exiles Server
- How To Change the Harvest Yield Multiplier on Your Conan Exiles Server
- How To Wipe the Map and Player Progress on Your Conan Exiles Server (Without Losing Settings)
- How To Install Mods on Your Conan Exiles Server
- How to Ban or Unban Players on a Conan Exiles Server
- How To Set Up a Whitelist for Your Conan Exiles Server
- How To Change the Maximum Clan Size Limit in Conan Exiles
- How To Configure the Message of the Day on a Conan Exiles Server
- How To Adjust Thrall Crafting and Breaking Speeds in Conan Exiles
- How To Adjust the Local Chat Radius on Your Conan Exiles Server
- How to Change Animal Pen Taming Speeds in Conan Exiles
- How To Speed Up Item Crafting Multipliers on a Conan Exiles Server
- How To Modify Resource Respawn Times on Your Conan Exiles Server
- How To Set Specific PvP Time Windows for a Conan Exiles Server
- How To Adjust Player Hunger and Thirst Rates in Conan Exiles
- How To Enable or Disable PvP on Your Conan Exiles Server
- How To Turn Off the Catch-Up Time Mechanic in Conan Exiles
- How To Modify Experience Multipliers for Kills and Harvesting in Conan Exiles
- How To Disable or Enable Friendly Fire on a Conan Exiles Server
- How To Modify Stamina Consumption Rates on Your Conan Exiles Server
- How To Toggle God Avatars On or Off in Conan Exiles
- How To Restrict Avatar Summoning Times on a Conan Exiles Server
- How to Change Player and NPC Damage Multipliers in Conan Exiles
- How to Enable or Disable Target Lock in Conan Exiles
- How To Change the Corpse Despawn Timer in Conan Exiles
- How To Adjust Sprinting Stamina Cost on Your Conan Exiles Server
- How To Restrict Corpse Looting on Your Conan Exiles Server
- How To Adjust Player Health Regeneration Rates in Conan Exiles
- How to Make Yourself an Admin on Your Conan Exiles Server
- How To Change Your Conan Exiles Server Name and Set a Password
- How To Connect to Your Conan Exiles Server
- How To Limit the Number of Purges Allowed per Day on Your Conan Exiles Server
- How To Completely Disable the Purge Mechanics on Your Conan Exiles
- How To Disable Building Decay on Your Conan Exiles Server
- How To Configure Structure Damage Settings on Your Conan Exiles Server
- How To Disable the Sandstorm Effect on Your Conan Exiles Server
- Show all articles ( 23 ) Collapse Articles
-
SCUM
- How to Find a User’s SteamID
- How to Change the Server Name on Your SCUM Server
- How to Change the Server Description on Your SCUM Server
- How To Add Admin Players to Your SCUM Server
- How to Change the Maximum Player Slots on Your SCUM Server
- How To Whitelist Players on Your SCUM Server
- How To Set a Server Password on Your SCUM Server
- How To Configure the Message of the Day (MOTD) on Your SCUM Server
- How To Change the Welcome Message on Your SCUM Server
- How To Ban and Unban Players on Your SCUM Server
- How To Silence Players on Your SCUM Server
- How To Set First- or Third-Person Perspective on Your SCUM Server
- How To Enable or Disable Global, Local and Squad Chat on Your SCUM Server
- How to Enable or Disable Events on Your SCUM Server
- How To Enable or Disable Mines and Traps on Your SCUM Server
- How To Enable or Disable Fog on Your SCUM Server
- How To Configure Respawn Options on Your SCUM Server
- How To Adjust Fame Gain Multiplier on Your SCUM Server
- How To Adjust Respawn Cooldowns on Your SCUM Server
- How To Adjust NPC Difficulty on Your SCUM Server
- How To Adjust NPC Health on Your SCUM Server
- How To Adjust Fuel Drain on Your SCUM Server
- How To Adjust Battery Drain on Your SCUM Server
- How To Adjust PvP Damage Multipliers on Your SCUM Server
- How To Enable or Disable Locked Loot Containers on Your SCUM Server
- How To Enable or Disable Coma on Your SCUM Server
- How To Enable or Disable Kill Notifications on Your SCUM Server
- How To Change the Maximum Ping Limit on Your SCUM Server
- How To Enable or Disable Voting on Your SCUM Server
- How To Enable or Disable Crosshairs on Your SCUM Server
- How To Enable or Disable Kill Claiming on Your SCUM Server
- How To Enable or Disable Map Access on Your SCUM Server
- How To Enable or Disable Automatic Parachute Opening on Your SCUM Server
- How To Enable or Disable New Player Protection on Your SCUM Server
- How To Adjust Mob Damage Multipliers on Your SCUM Server
- How To Enable or Disable Quests on Your SCUM Server
- How To Enable or Disable PvP on Your SCUM Server
- How To Enable or Disable Base Building on Your SCUM Server
- How To Configure Day/Night Cycle Speed on Your SCUM Server
- How To Set Respawn Prices on Your SCUM Server
- How To Adjust Vehicle Spawn Limits on Your SCUM Server
- Show all articles ( 26 ) Collapse Articles
-
Windrose
- How To Change the Invite Code on Your Windrose Server
- How To Change Boarding Difficulty Multiplier on Your Windrose Server
- How To Change Enemy Damage Multiplier on Your Windrose Server
- How To Change Ship Health Multiplier on Your Windrose Server
- How To Enable or Disable Immersive Exploration on Your Windrose Server
- How To Change Ship Damage Multiplier on Your Windrose Server
- How To Change the World Name on Your Windrose Server
- How To Enable or Disable Shared Quests on Your Windrose Server
- How To Change the World Difficulty on Your Windrose Server
- How To Configure Direct Connection on Your Windrose Server
- How To Change the Server Region on Your Windrose Server
- How To Enable or Disable Direct Connection on Your Windrose Server
- How To Change the Max Player Count on Your Windrose Server
- How To Change the Server Name on Your Windrose Server
- How To Change the Password on Your Windrose Server
- How To Enable or Disable Password on Your Windrose Server
- How to Find a User’s SteamID
- Show all articles ( 2 ) Collapse Articles
-
Sons Of The Forest
- How To Change the Server Name on Your Sons of the Forest Server
- How To Set a Password on Your Sons of the Forest Server
- How To Change the Max Player Count on Your Sons of the Forest Server
- How To Change the Game Mode on Your Sons of the Forest Server
- How To Skip the Network Test on Your Sons of the Forest Server
- How To Add an Admin to Your Sons of the Forest Server
- How To Remove an Admin From Your Sons of the Forest Server
- How To Enable Tree Regrowth on Your Sons of the Forest Server
- How To Enable or Disable Structure Damage on Your Sons of the Forest Server
- How To Enable or Disable Enemy Spawning on Your Sons of the Forest Server
- How To Change Enemy Health on Your Sons of the Forest Server
- How To Change Enemy Armour on Your Sons of the Forest Server
- How To Change Enemy Damage on Your Sons of the Forest Server
- How to Find a User’s SteamID
- How To Enable or Disable the Password on Your Sons of the Forest Server
- How To Connect to Your Sons of the Forest Server via Direct Connect (IP)
- Show all articles ( 1 ) Collapse Articles
-
Don't Starve Together
- How To Change the Name and Description of Your Don’t Starve Together Server
- How To Add Mods to Your Don’t Starve Together Server
- How to Find a User’s SteamID
- How To Disable Auto-Pause When Empty on Your Don’t Starve Together Server
- How To Enable PVP on Your Don’t Starve Together Server
- How To Set Your Don’t Starve Together Server to Private
- How to Change the Game Mode (Survival, Endless, Wilderness) on Your Don't Starve Together Server
- How To Configure World Generation on Your Don’t Starve Together Server
- How To Add an Admin to Your Don’t Starve Together Server
- How To Get a Cluster Token and Add It to Your Don’t Starve Together Server
- How To Change a Player’s Character on Your Don’t Starve Together Server
- How To Kick and Ban Players From Your Don’t Starve Together Server
- How To Upload a Save to Your Don’t Starve Together Server
- How To Change the Day Length on Your Don’t Starve Together Server
- How To Change the Resource Regrowth Settings on Your Don’t Starve Together Server
- How To Change the Season Length on Your Don’t Starve Together Server
- How To Disable Ghost Sanity Drain on Your Don’t Starve Together Server
- How To Disable the Max Health Penalty on Your Don’t Starve Together Server
- How To Enable Holiday Events on Your Don’t Starve Together Server
- How To Enable Portal Revives on Your Don’t Starve Together Server
- How To Enable Vote Kicking on a Don’t Starve Together Server
- How To Enable Spawn Protection on Your Don’t Starve Together Server
- How To Spawn Items in Your Don’t Starve Together Server
- How To Link Your Steam Group With Your Don’t Starve Together Server
- How To Find Your Klei ID on Dont Starve Together
- How To Whitelist Your Don’t Starve Together Server
- How to Get a Server Token for Your Don’t Starve Together Server
- How to Disable Specific Seasons on Your Don't Starve Together Server
- How To Change the Maximum Number of Players on Your Don’t Starve Together Server
- How To Change the World Size on Your Don’t Starve Together Server
- How To Set the Server Intent (Cooperative, Competitive, Social, Madness) on Your Don’t Starve Together Server
- How To Set a Password on Your Don’t Starve Together Server
- How To Add a Server Token to Your Don’t Starve Together Server
- How To Make Seasons Last Forever on Your Don’t Starve Together Server
- How To Change the Starting Season on Your Don’t Starve Together Server
- How To Change the Tick Rate on Your Don’t Starve Together Server
- How To Reduce Lag on Your Don’t Starve Together Server
- How To Fix Cave Connection Errors on Your Don’t Starve Together Server
- How To Regenerate Caves on Your Don’t Starve Together Server
- How To Set Up the Caves Shard on Your Don’t Starve Together Server
- How To Configure Portal Migration Between Shards on Your Don’t Starve Together Server
- How To Switch World Generation Presets on Your Don’t Starve Together Server
- How To Configure Multiple World Clusters on Your Don’t Starve Together Server
- How To Enable or Disable Caves on Your Don’t Starve Together Server
- How To Roll Back Your Don’t Starve Together Server to a Previous Day
- Show all articles ( 30 ) Collapse Articles
-
Counter Strike 2
- How to Host a Counter Strike 2 Server
- How To Enable the Developer Console on CS2
- How To Add a Password to Your Counter Strike 2 Server
- How To Change the Max Players on Your Counter Strike 2 Server
- How To Change the Server Name on Your Counter Strike 2 Server
- How To Disable Anti-Cheat on Your Counter Strike 2 Server
- How to Find a User’s SteamID
- How To Enable Infinite Ammo and Infinite Grenades for Practice on Your CS2 Server
- How To Enable/Disable Friendly Fire on Your CS2 Server
- How To Change the Map on Your CS2 Server
- How To Show Bullet Impacts and Grenade Trajectories on Your CS2 Server
- How To Install MetaMod on Your CS2 Server
- How To Install CounterStrikeSharp on Your CS2 Server
- How To Add & Manage Plugins on Your CS2 Server
- How To Kick All Bots or Add Specific Bot Difficulty Levels on Your CS2 Server
- How To Configure Round Time and Match Time on Your CS2 Server
- How To Add Custom and Workshop Maps to Your CS2 Server
- How To Enable Pause and Timeout for Competitive Play on Your CS2 Server
- How To Freeze Bots or Make Them Mimic Your Movement on Your CS2 Server
- How To Set Start Money on Your CS2 Server
- How To Enable/Disable Auto Team Balance on Your CS2 Server
- How To Install the GunGame Plugin on Your CS2 Server
- How To Set Up Practice Mode on Your CS2 Server
- How To Bind Keys Using Console on Your CS2 Server
- How To Enable/Disable sv_cheats on Your CS2 Server
- How To Configure Your CS2 Server
- How To Install a Player Model Manager Plugin on Your CS2 Server
- How To Install MultiAddonManager on Your CS2 Server
- How To Install MenuManagerCS2 on Your CS2 Server
- How To Install a Retake Plugin on Your CS2 Server
- How To Install PlayerSettings on Your CS2 Server
- How To Install AnyBaseLibCS2 on Your CS2 Server
- How To Configure Player Join Grace Time on Your CS2 Server
- How To Configure Player Respawn on Death on Your CS2 Server
- How To Configure Custom Gravity Settings on Your CS2 Server
- How To Configure an Endless Free-for-All Deathmatch on Your CS2 Server
- How To Enable/Disable Automatic Player Respawns on Your CS2 Server
- How To Configure Weapon and Item Drops on Your CS2 Server
- How To Install the MatchZy Plugin on Your CS2 Server
- How To Manage AFK Players and Auto-Kick Settings on Your CS2 Server
- How To Configure Random Spawns on Your CS2 Server
- How To Enable/Disable Knife Dropping and Manage Gun Drops on Your CS2 Server
- How to Update Your CS2 Server to the Latest Version
- How To Extend or Remove the Buy Time Limit on Your CS2 Server
- How To Set Starting Money on Your CS2 Server
- How To Increase/Decrease the Max Grenade Limit on Your CS2 Server
- How To Change the Maximum Rounds per Match on Your CS2 Server
- How To Control Match Clinching on Your CS2 Server
- How To Install MovementUnlocker on Your CS2 Server
- How To Install cs2-Fake-Rcon on Your CS2 Server
- How To Install ServerListPlayersFix on Your CS2 Server
- How To Configure Spawn Protection and Invulnerability on Your CS2 Server
- How to Auto-Equip Defuse Kits for CTs on Your CS2 Server
- How To Give Players Free Armor and Helmets on Your CS2 Server
- How To Change the C4 Bomb Timer on Your CS2 Server
- How To Configure Spectator Rules and Camera Restrictions on Your CS2 Server
- How To Create an Infinite Warmup on Your CS2 Server
- How To Enable All-Talk During Warmup and Halftime on Your CS2 Server
- How to Set Up a Jailbreak Server on Your CS2 Server
- How to Set Up an Admin Team on Your CS2 Server
- How to Set Permission Levels of Admins on Your CS2 Server
- How to Install and Configure CS2-ChatManager Plugin on Your CS2 Server
- How To Enable Buying Anywhere on the Map on Your CS2 Server
- How to Install the CS2-BotAI Plugin on Your CS2 Server
- How to Install AFKManager Plugin on Your CS2 Server
- How To Add Server Tags To Improve Visibility for Your CS2 Server
- How to Install and Configure CS2-Tags Plugin on Your CS2 Server
- How To Configure Overtime for Competitive Matches on Your CS2 Server
- How To Configure Voice Chat and All-Talk on Your CS2 Server
- How To Allow Dead Players To Talk to the Living on Your CS2 Server
- How To Install ZombieSharp Plugin on Your CS2 Server
- How to Install the InstaDefuse Plugin on Your CS2 Server
- How To Enable/Disable Warmups on Your CS2 Server
- How to Install the CS2KZ (Kreedz) Plugin on Your CS2 Server
- Show all articles ( 59 ) Collapse Articles
-
Abiotic Factor
-
Astroneer
-
Core Keeper
-
ASKA
-
Space Engineers
-
- How To Enable or Disable Oxygen and Pressurisation on Your Space Engineers Server
- How To Configure Asteroid Density on Your Space Engineers Server
- How To Configure Trash Removal and Auto-Cleanup on Your Space Engineers Server
- How To Reduce Lag by Limiting Floating Objects on Your Space Engineers Server
- How To Change the View Distance on Your Space Engineers Server
-
- How To Add an Admin to Your Space Engineers Server
- How To Set a Password on Your Space Engineers Server
- How To Turn the Weather System On or Off on Your Space Engineers Server
- How To Turn Off Turret Friendly Fire on Your Space Engineers Server
- How To Upload a Custom Local World to Your Space Engineers Server
- How To Enable In-Game Scripts on Your Space Engineers Server
- How To Enable Crossplay (EOS) for Xbox and PlayStation Players on Your Space Engineers Server
-
- How To Change the Day and Night Cycle on Your Space Engineers Server
- How To Disable Meteor Showers on Your Space Engineers Server
- How To Disable Thruster Damage on Your Space Engineers Server
- How To Enable or Disable Copy Paste Tool on Your Space Engineers Server
- How To Change the Inventory Size Multiplier on Your Space Engineers Server
- How To Enable Experimental Mode on Your Space Engineers Server
- How To Enable or Restrict Spectator Mode for Players in Space Engineers
- How To Enable or Disable Permanent Death on Your Space Engineers Server
- How To Enable or Disable Weather Lightning Damage in Space Engineers
- How To Enable Cargo Ships and Random Encounters on Your Space Engineers Server
- How To Remove or Increase the PCU Limit on Your Space Engineers Server
- How To Enable or Disable Third-Person View on Your Space Engineers Server
- How To Enable or Disable Jetpacks on Your Space Engineers Server
- How To Change Assembler and Refinery Speeds on Your Space Engineers Server
- How To Enable or Disable Weapons on Your Space Engineers Server
- How To Enable or Disable Drones on Your Space Engineers Server
- How To Enable or Disable Unknown Signals on Your Space Engineers Server
- How To Enable the Economy System and Trading Stations on Your Space Engineers Server
- How To Disable Target Lock on Your Space Engineers Server
- How To Change Block Limits To Be per Faction or per Player on Your Space Engineers Server
- How To Enable or Disable Player Progression (Tech Trees) on Your Space Engineers Server
- How To Set the Maximum Faction Count on Your Space Engineers Server
- How To Change Respawn Ship Cooldowns on Your Space Engineers Server
- How To Enable or Disable Destructible Blocks on Your Space Engineers Server
- How To Enable or Disable Realistic Sound on Your Space Engineers Server
- How To Limit the Maximum Number of Active Grids per Player in Space Engineers
- How To Enable “Voxel Hand” Permissions for Admins in Space Engineers
- How To Force Players To Spawn in Space Instead of on Planets in Space Engineers
- Show all articles ( 13 ) Collapse Articles
- How to Change Your Space Engineers Server MOTD
- How to Make Your Space Engineers Server Cross-Platform
- How to Change Your Space Engineers Server Description
- How to Change Your Space Engineers Server Name
- How to Change the Maximum Player Count on Your Space Engineers Server
- How to Change the Gamemode of Your Space Engineers Server
- How to Find a User’s SteamID
-
Insurgency: Sandstorm
-
- Articles coming soon
- How To Change Melee Hit Settings on Your Insurgency Server
- How To Configure AI Investigation Behaviour on Your Insurgency Server
- How To Enable/Disable Auto Team Balance on Your Insurgency Sandstorm Server
- How To Customise Supply Points on Your Insurgency Sandstorm Server
- How To Change AI Difficulty on Your Insurgency Sandstorm Server
- How To Adjust Maximum Player Health on Your Insurgency Server
- How To Enable Player Vote Kicking on Your Insurgency Sandstorm Server
- How To Set Up End-of-Match Map Voting on Your Insurgency Sandstorm Server
- How To Enable RCON on Your Insurgency Sandstorm Server
- How To Configure Friendly Fire Statistics on Your Insurgency Server
- How To Customise Advanced AI Perception and Detection Ranges on Your Insurgency Server
- How To Optimise Advanced AI Logic and Combat on Your Insurgency Server
- How To Customise Bot Movement and AI Behaviour on Your Insurgency Sandstorm Server
- How To Fix Rubberbanding on Your Insurgency Sandstorm Server
- How To Set AI Bot Limits on Your Insurgency Sandstorm Server
- How To Join Your Insurgency Sandstorm Server
- How To Set a Password on Your Insurgency Sandstorm Server
- How To Change the Name of Your Insurgency Sandstorm Server
- How To Set Max Player Limit on Your Insurgency Sandstorm Server
- How to Configure Headshot Damage Multipliers on Your Insurgency Server
- How to Find a User’s SteamID
- How to Update Your Insurgency Sandstorm Server to the Latest Version
- How To Enable/Disable Sprinting and Sliding on Your Insurgency Sandstorm Server
- How To Change the Pre-Round (Warmup) Time Duration on Your Insurgency: Sandstorm Server
- How to Change the Enemy Bot Difficulty on Your Insurgency Sandstorm Server
- How To Change the Final Extraction Timer on Your Insurgency Sandstorm Server
- How To Change or Disable the Game Time Limit on Your Insurgency Sandstorm Server
- How To Enable/Disable Vehicle Insertions on Your Insurgency Sandstorm Server
- How To Change the Match Win Limit on Your Insurgency Sandstorm Server
- How To Adjust Supply Point Rewards for Completing Objectives on Your Insurgency Sandstorm Server
- How To Change the Team Kill Forgiveness Timer on Your Insurgency Sandstorm Server
- How To Change the Team Kill Limit on Your Insurgency Sandstorm Server
- How To Enable/Disable Third-Person Spectating on Your Insurgency Sandstorm Server
- How To Enable/Disable Spectating on Your Insurgency Sandstorm Server
- How To Enable/Disable Killer Info on Your Insurgency Sandstorm Server
- How To Enable/Disable the Kill Feed on Your Insurgency Sandstorm Server
- How To Change Stamina Drain Rates on Your Insurgency Sandstorm Server
- How To Modify Objective Capture Times on Your Insurgency Sandstorm Server
- How To Change Player Respawn Timer Delays on Your Insurgency Sandstorm Server
- How to Add/Remove Admins on Your Insurgency Sandstorm Server
- How to Change Lighting Conditions (Day/Night Maps) on Your Insurgency Sandstorm Server
- How to Set Up a Weight-Impacted Stamina System on Your Insurgency Sandstorm Server
- How to Create a Hardcore One-Shot-Kill Tactical Realism on Your Insurgency Sandstorm Server
- How to Configure Server Suppression Effects on Your Insurgency Sandstorm Server
- How to Set Up a Custom Map Cycle on Your Insurgency Sandstorm Server
- How to Set Up an Aggressive AI Fire Support Bombardment on Your Insurgency Sandstorm Server
- How To Assign Admin Privileges on Your Insurgency Sandstorm Server
- How to Install Custom Mod Map on Your Insurgency Sandstorm Server
- How To Change the Round Time Duration on Your Insurgency Sandstorm Server
- How To Set Up a Server MOTD (Message of the Day) on Your Insurgency Sandstorm Server
- How to Force AI Bots to Use Smoke and Flashbangs on Your Insurgency Sandstorm Server
- How to Configure a Zero UI on Your Insurgency Sandstorm Server
- How to Setup an Arsenal Sandbox on Your Insurgency Sandstorm Server
- How to Create a Slow-Paced Milsim on Your Insurgency Sandstorm Server
- How to Setup an No-Respawn Elimination Mode on Your Insurgency Sandstorm Server
- How to Set Up Night Bots for Outpost Mode on Your Insurgency Sandstorm Server
- How to Configure Dynamic AI Scaling for Player Count on Your Insurgency Sandstorm Server
- How to Configure Proximity-Only Voice Chat on Your Insurgency Sandstorm Server
- How To Generate and Add a GSLT Auth Token for the Public Server Browser for Your Insurgency Sandstorm Server
- How to Disable the HUD and Killfeed on Your Insurgency Sandstorm Server
- How to Generate and Add a GameStats Token (GST) to Your Insurgency: Standstrom Server
- How to Configure a Sniper Alley Bot on Your Insurgency Sandstorm Server
- How to Set Up Flanking AI for Tactical Checkpoint on Your Insurgency Sandstorm Server
- Show all articles ( 48 ) Collapse Articles
-
-
Euro Truck Simulator 2
- How to Enable the Developer Console in Euro Truck Simulator 2
- How To Use Steam Workshop Mods With Your Euro Truck Simulator 2 Server
- How to Access the Server Config File in Euro Truck Simulator 2 Server
- How to Change the Max Player Limit on Your Euro Truck Simulator 2 Server
- How to Enable Anti-Collision Mode on Your Euro Truck Simulator 2 Server
- How to Change Your Euro Truck Simulator 2 Server Name
- How To Get and Set Up a Server Logon Token for Your ETS2 Server
- How to Make Your Server Friends-Only on Your Euro Truck Simulator 2 Server
- How to Add a Welcome Message to Your Euro Truck Simulator 2 Server
- How to Find a User’s SteamID
- How to Enable or Disable AI Traffic on Your Euro Truck Simulator 2 Server
- How to Enable or Disable the Speed Limiter on Your Euro Truck Simulator 2 Server
- How to Use the Mods Optioning Setting on Your Euro Truck Simulator 2 Server
- How To Toggle In-Menu Ghosting on Your Euro Truck Simulator 2 Server
- How to Install Mods on Your Euro Truck Simulator 2 Server
- How to Control Traffic Load on Your Euro Truck Simulator 2 Server
- How to Enable or Disable Player Damage on Your Euro Truck Simulator 2 Server
- How to Add Custom Radio Stations to Your Euro Truck Simulator 2 Server
- How to Enable or Disable Player Name Tags on Your Euro Truck Simulator 2 Server
- How to Change the Timezone on Your Euro Truck Simulator 2 Server
- How To Show or Hide Your Euro Truck Simulator 2 Server From the Server Browser
- How to Set a Password on Your Euro Truck Simulator 2 Server
- How to Add Custom Music to Your Euro Truck Simulator 2 Server
- How To Export Server Packages From Euro Truck Simulator 2
- How to Add a Moderator to Your Euro Truck Simulator 2 Server
- Show all articles ( 10 ) Collapse Articles
-
American Truck Simulator
- How to Change Server Name on Your American Truck Simulator Server
- How to Set a Server Password on Your American Truck Simulator Server
- How to Change Server Description on Your American Truck Simulator Server
- How to Add a Welcome Message on Your American Truck Simulator Server
- How to Enable or Disable Player Damage on Your American Truck Simulator Server
- How to Enable or Disable Traffic on Your American Truck Simulator Server
- How to Enable or Disable Speed Limiter on Your American Truck Simulator Server
- How to Enable or Disable Mod Optioning on Your American Truck Simulator Server
- How to Enable or Disable Name Tags on Your American Truck Simulator Server
- How to Make Your Server Private (Friends Only) on Your American Truck Simulator Server
- How To Hide Your Server From Server Browser on Your American Truck Simulator Server
- How to Change Maximum Vehicles on Your American Truck Simulator Server
- How to Adjust AI Vehicles Per Player on Your American Truck Simulator Server
- How to Adjust AI Vehicle Spawn Limit on Your American Truck Simulator Server
- How to Enable or Disable Hide in Company on Your American Truck Simulator Server
- How to Enable or Disable Hide Colliding Vehicles on Your American Truck Simulator Server
- How to Enable or Disable Service No Collision on Your American Truck Simulator Server
- How to Enable or Disable In Menu Ghosting on Your American Truck Simulator Server
- How to Change Maximum Players on Your American Truck Simulator Server
- How to Find a User’s SteamID
- Show all articles ( 5 ) Collapse Articles
-
Arma Reforger
- How to Find a User’s SteamID
- How To Force Repair Server Files on Your Arma Reforger Server
- How To Show or Hide Your Arma Reforger Server in the Browser
- How To Change the Max FPS Limit on Your Arma Reforger Server
- How To Disable Third Person View on Your Arma Reforger Server
- How To Change the Game Scenario on Your Arma Reforger Server
- How To Change the Server Region on Your Arma Reforger Server
- How To Enable BattlEye Anti-Cheat on Your Arma Reforger Server
- How To Change the Maximum Player Count on Your Arma Reforger Server
- How To Change the Server Name on Your Arma Reforger Server
- How To Set a Server Password on Your Arma Reforger Server
- How To Enable or Disable Automatic Updates on Your Arma Reforger Server
- How To Add Mods to Your Arma Reforger Server
- How to Find Mods for Your Arma Reforger Server
- How To Add Admins on Your Arma Reforger Server
- How To Change Network View Distance on Your Arma Reforger Server
- How To Toggle Crossplay on Your Arma Reforger Server
- How To Change Server Minimum Grass Distance on Your Arma Reforger Server
- How To Change Voice Chat UI Settings on Your Arma Reforger Server
- How To Change Max View Distance on Your Arma Reforger Server
- How to Ban/Unban Players on Your Arma Reforger Server
- How to Set a Player Reservation Timeout on Your Arma Reforger Server
- How to Remove Mods From Your Arma Reforger Server
- How To Kick a Player From Your Arma Reforger Server
- How to Whitelist/Blacklist RCON Commands on Your Arma Reforger Server
- How to Adjust Server Join Queue Limits on Your Arma Reforger Server
- How to Change the AI Limit on Your Arma Reforger Server
- How to Set Up an RCON Connection on Your Arma Reforger Server
- How to Enable Game Master Mode on Your Arma Reforger Server
- How To Configure Player Save Time on Your Arma Reforger Server
- Show all articles ( 15 ) Collapse Articles
-
Schedule I
- How To Add Admins on Your Schedule 1 Server
- How To Change Your Schedule 1 Server Name and Description
- How To Set a Server Password on Your Schedule 1 Server
- How To Increase the Max Player Cap on Your Schedule 1 Server
- How To Switch Your Schedule 1 Server to the Required Beta Branch
- How To Set Up Steam Authentication on Your Schedule 1 Server
- How To Enable Anonymous or Persistent Steam Game Server Login on Your Schedule 1 Server
- How To Fix Players Getting Disconnected During Login on Your Schedule 1 Server
- How To Secure Your Schedule 1 Server Against Unauthorized Access and Griefing
- How To Create Custom Staff Permission Groups on Your Schedule 1 Server
- How To Import an Existing Single-Player Save Into Your Schedule 1 Dedicated Server
- How To Fix “Version Mismatch” Errors Between Your Schedule 1 Server and Players
- How To Restrict Which Client Mods Can Join Your Schedule 1 Server
- How To Ban and Unban Players on Your Schedule 1 Server
- How To Install and Configure Better Employees on Your Schedule 1 Server
- How To Fix “Modded Client Rejected” Errors on Your Schedule 1 Server
- How To Install and Configure OverTheCounter on Your Schedule 1 Server
- How To Install and Configure MoreGuns on Your Schedule 1 Server
- How to Install and Configure Property Renovations on Your Schedule 1 Server
- How To Install and Configure AdvancedDealing on a Schedule 1 Server
- How To Install and Configure EvenBetterMiniMap on Your Schedule 1 Server
- How To Protect Your Schedule 1 Server From Malicious Mods and Security Threats
- How To Install and Configure the No More Trash Mod on Your Schedule 1 Server
- How To Install and Use the TrashGrabber PLUS Mod in Schedule 1
- How To Lower the Memory Usage of Your Schedule 1 Server
- How To Choose the Starting Quest Point for a Fresh Save on Your Schedule 1 Server
- How To Enable or Disable Sleeping on Your Schedule 1 Server
- How To Pause the World When No Players Are Online on Your Schedule 1 Server
- How To Install and Configure NetEye Security Cameras on Your Schedule 1 Server
- How To Change the Day and Night Cycle Time on Your Schedule 1 Server
- How to Clear World Trash and Dropped Items on Your Schedule 1 Server
- How To Configure Cartel Influence and Hostility on Your Schedule 1 Server
- How To Adjust Police Heat, Warrants, and Aggression on Your Schedule 1 Server
- How To Modify Player Ranks and Street Reputation on Your Schedule 1 Server
- How To Change Spawn Location on Your Schedule 1 Server
- How To Increase the Framerate Cap of Your Schedule 1 Server
- How to Install and Configure Cartel Enforcer on Your Schedule 1 Server
- How To Install and Configure AutoLaunder on Your Schedule 1 Server
- How To Install and Configure AutoRestock on Your Schedule 1 Server
- How To Install and Use the Auto Clear Completed Deals Mod in Schedule 1
- How To Install and Configure the K9 Patrol Mod in Your Schedule 1 Server
- How To Install and Use the SkillTree Mod in Your Schedule 1 Server
- How to Install and Configure the Schedule I FPS Boost Mod in Your Schedule 1 Server
- How To Install and Use the Mod Manager & Phone App Mod in Schedule 1
- How To Edit Player Cash and Bank Balance on Your Schedule 1 Server
- Show all articles ( 30 ) Collapse Articles
-
Discord Bot Hosting
-
- How to Use Selenium With Your Python Discord Bot
- How to Add Additional Python Modules on the Cybrancee Panel
- How to Use PyNaCl for Your Discord Bot
- How to Connect Your Python Discord Bot to a MySQL Database
- How To Set Up a HTTP Endpoint for Your Python Discord Bot
- How To Use SQLite for Your Python Discord Bot
- How to Change the Python Version of Your Discord Bot
- How to Enable Text-to-Speech (TTS) in Your Python Discord Bot
- How To Send Emails Using Your Python Discord Bot
- How to Create a Dropdown Menu on Your Python Discord Bot
- How To Use requirements.txt on Your Python Discord Bot
- How to Create a Button on Your Python Discord Bot
- How to Create Separators and Containers on Your Python Discord Bot
-
- How to Use Puppeteer With Your NodeJS Discord Bot
- How To Add Additional JavaScript Modules on the Cybrancee Panel
- How To Set Up a HTTP Endpoint for Your NodeJS Discord Bot
- How To Use SQLite for Your NodeJS Discord Bot
- How to Connect Your Node.js Discord Bot to MySQL
- How to Uninstall Node Packages on Your Discord Bot
- How to Change the NodeJS Version of Your Discord Bot
- What Is the package.json and package-lock.json File For
- How to Create a Dropdown Menu on Your NodeJS Discord Bot
- How to Create Separators and Containers on Your NodeJS Discord Bot
- How to Create a Button on Your NodeJS Discord Bot
- How To Send Emails Using Your NodeJS Discord Bot
- How To Enable Text-to-Speech (TTS) on Your NodeJS Discord Bot
- How To Update Your NodeJS Discord Bot’s Status
-
- How to Find a Discord Role ID
- How to Find a Discord Channel ID
- How to Find a Discord Guild ID
- How to Find a Discord User ID
- How to Enable Developer Mode on Discord
- How to Find a Discord Event ID
- How to Find a Discord Thread ID
- How to Find a Discord Message ID
- How to Automatically Restart Your Bot After Pushing Changes to GitHub
- How To Externally Host a Replit Discord Bot
- How to Reset Your Discord Bot Token
- How to Enable Privileged Intents for Discord Bots
- How To Pause Invites on Your Discord Server
- How To Enable Community on Your Discord Server
- How To Configure Your Discord Server Notifications
- How To Configure Your Discord Server Privacy Settings
- How To Make Your Discord Server Age-Restricted
- How To Get Your Discord Server on Discovery
- Show all articles ( 3 ) Collapse Articles
-
- Bot Is Running, but Doesn't Show as Online on the Cybrancee Panel
- Troubleshooting Common Database Connection Errors
- Troubleshooting Rate Limits on Your Discord Bot
- Explanation of NPM Vulnerability Messages
- Troubleshooting Common Puppeteer Browser Errors
- Troubleshooting Common Git Integration Issues
- Troubleshooting Common NPM Errors
- Discord Bot Slash Commands Not Showing After Registration
-
Web Hosting
-
- Articles coming soon
-
- How to Move a File in Plesk
- How to Rename a File in Plesk
- How To Add a ZeroSSL Certificate in Plesk
- Extending SSL Coverage to Include Mail in Plesk
- How to Upload Files in Plesk
- Creating Email Addresses in Plesk
- Enabling the .htaccess File in Plesk
- How to Create Additional Plesk Users
- How to Create MySQL Databases in Plesk
- How to Create MySQL Users in Plesk
- How to Create Subdomains in Plesk
- How to Extract From a Zip File in Plesk
- How to Force HTTPS in Plesk
- How to Update Your Plesk Profile Password and Email Address
- How to View Disk and Traffic Usage in Plesk
- Managing DNS in Plesk
- Accessing and Creating FTP Users in Plesk
- Accessing Emails Through Webmail in Plesk
- Adding an Addon Domain in Plesk
- Adding an SPF Record in Plesk
- Adding an SSL Certificate in Plesk
- Blocking IP Addresses From Accessing Websites in Plesk
- Changing the PHP Version in Plesk
- Changing the Upload File Size Limit in Plesk
- Setting Up Email Forwarding in Plesk
- Understanding and Modifying File Permissions in Plesk
- How to Set Up a Scheduled Job (Cron Job) in Plesk
- Show all articles ( 12 ) Collapse Articles
-
- How to Detach and Attach WPToolkit in Plesk
- How to Install a Plugin on WordPress
- How to Install a Theme on WordPress
- How to Upload a Plugin to WordPress
- How to Upload a Theme to WordPress
- How to Log Into WordPress via Plesk
- How to Secure Your WordPress Installation in Plesk
- Installing WordPress in Plesk
-
-
Domains
-
Control Panel
- How to Lock/Unlock a Backup on Your Cybrancee Panel
- How to Automatically Schedule Backups on Your Cybrancee Panel
- How to Delete a Backup on Your Cybrancee Panel
- How To Restore a Backup on Your Cybrancee Panel
- How To Create and Restore a Backup on Your Cybrancee Panel
- How to Create a Database on the Cybrancee Panel
- How to Easily Upload Folders to Your Cybrancee Panel
- How to Get a Cybrancee Panel Server IP Address
- How To Configure Schedules and Automatic Restarts on Cybrancee
- How to Add a Port in Your Cybrancee Panel
- Getting Support With the Cybrancee Panel
- How to Change the Egg Version on the Cybrancee Panel
- How To Connect to the Cybrancee Panel via SFTP
- How to Create a File on the Cybrancee Panel
- How to Move Files on the Cybrancee Panel
- How To Reinstall or Factory Reset Your Cybrancee Server
- How to Rename Your Cybrancee Panel Server
- How to Reset Your Password on the Cybrancee Panel
- How to Upload Files Through the Cybrancee Panel
- How to Enable Two-Step Verification on the Cybrancee Panel
- Using Cybrancee Panel Controls
- What Is CRON Syntax?
- Show all articles ( 7 ) Collapse Articles
-
Account
How To Kick a Player via Console on Your V Rising Server
Note:
The kickuser command allows an administrator to remove a player from your V Rising server. Kicking only disconnects the player from the server; it does not permanently prevent them from joining again. You need to have administrator access and the in-game console enabled before using the command
1. Log In to Your Panel
2. Stop Your Server
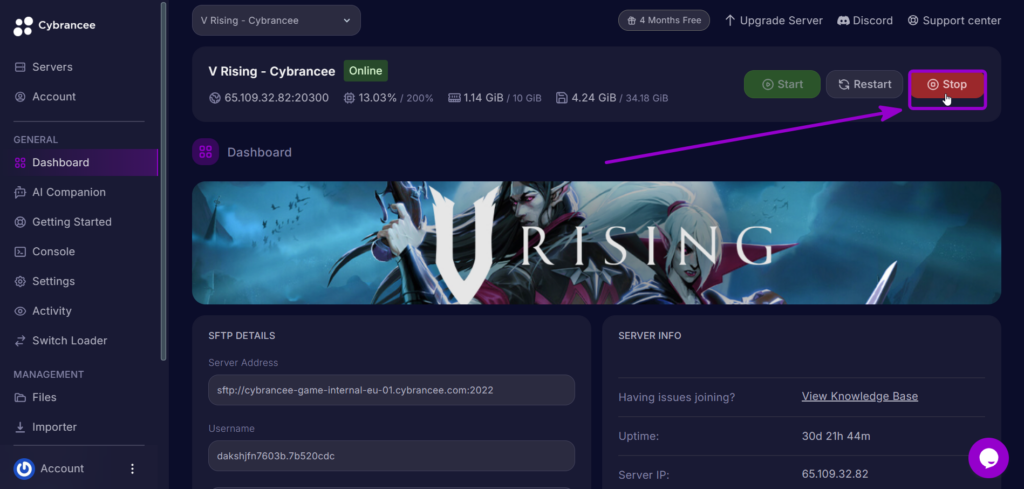
3. Select the ‘Files’ Tab
Scroll down the Sidebar until you find the Files Tab.
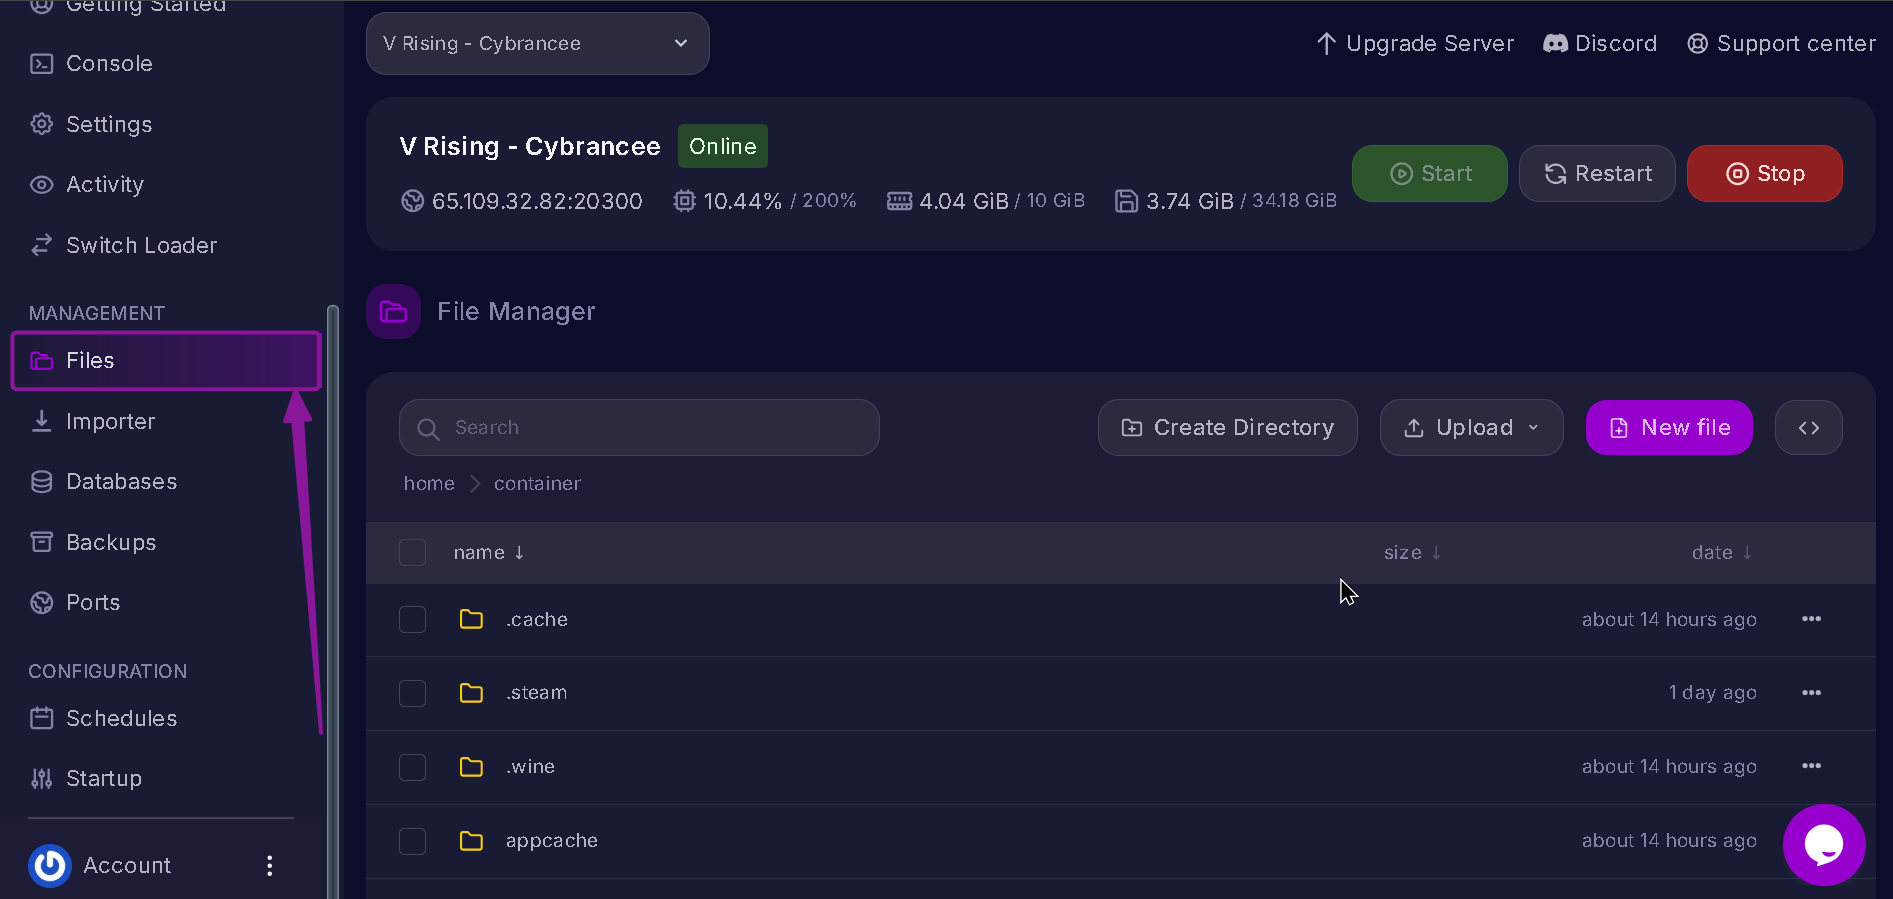
4. Locate the ‘adminlist.txt’ File
Navigate to:
save-data/Settings
Search for adminlist.txt in the file manager and open the file.
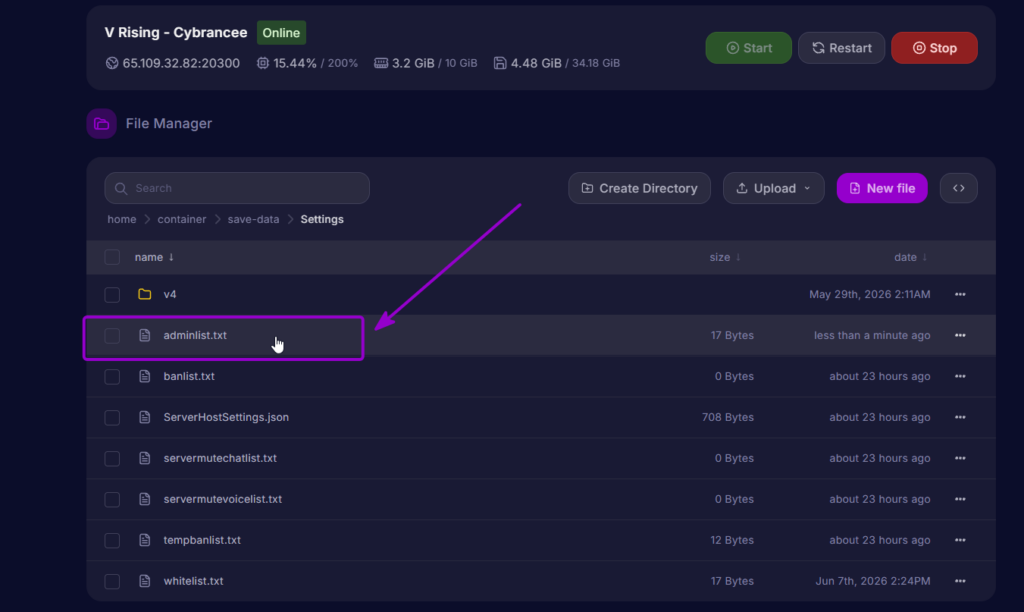
5. Add Yourself as an Administrator
Enter your SteamID64 in adminlist.txt on a new line.
For example:
7651198xxxxxxx
Save the file after adding your SteamID64.
Make sure you enter the correct SteamID64, as this is what the server uses to identify your administrator account.
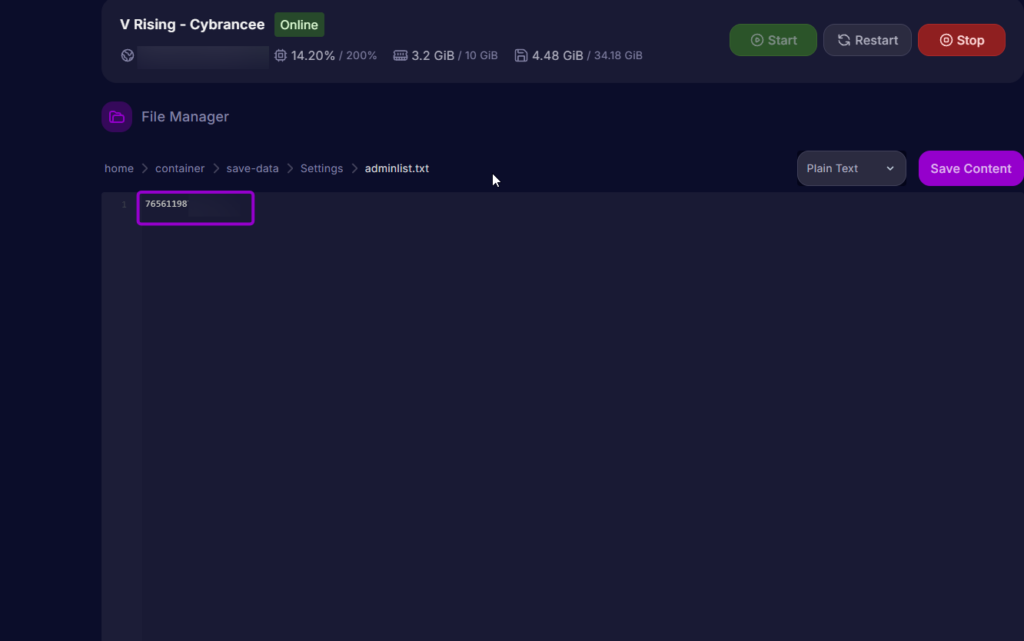
6. Save the Newly Made Changes
Use the highlighted button to do so.
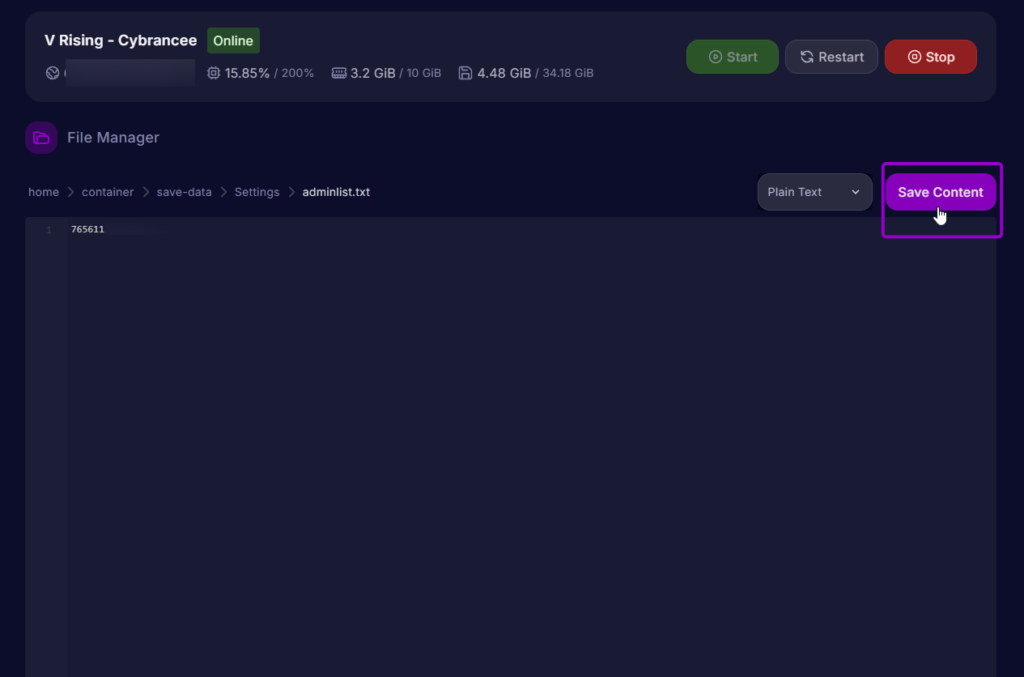
7. Restart Your Server and Game
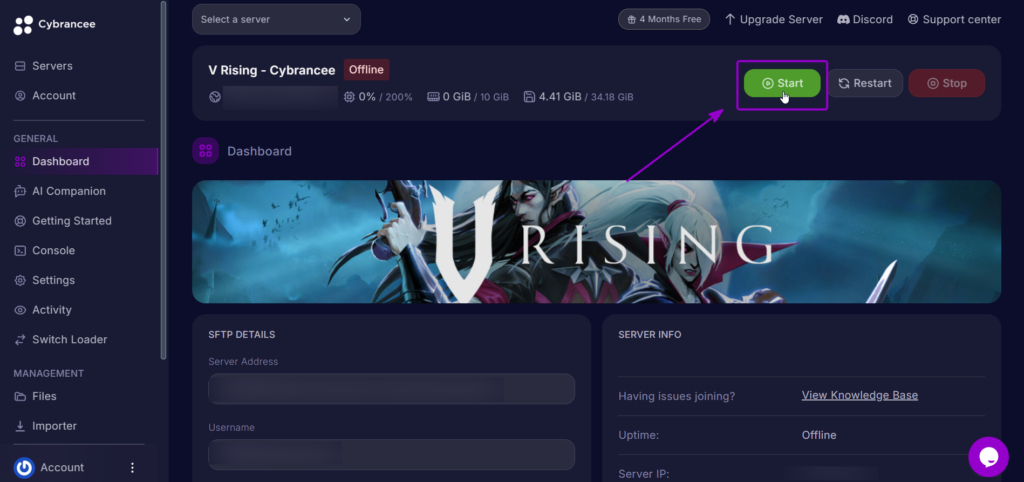
8. Enable the In-Game Console
Launch V Rising and go to:
Options > General > Interface
Enable Console Enabled.
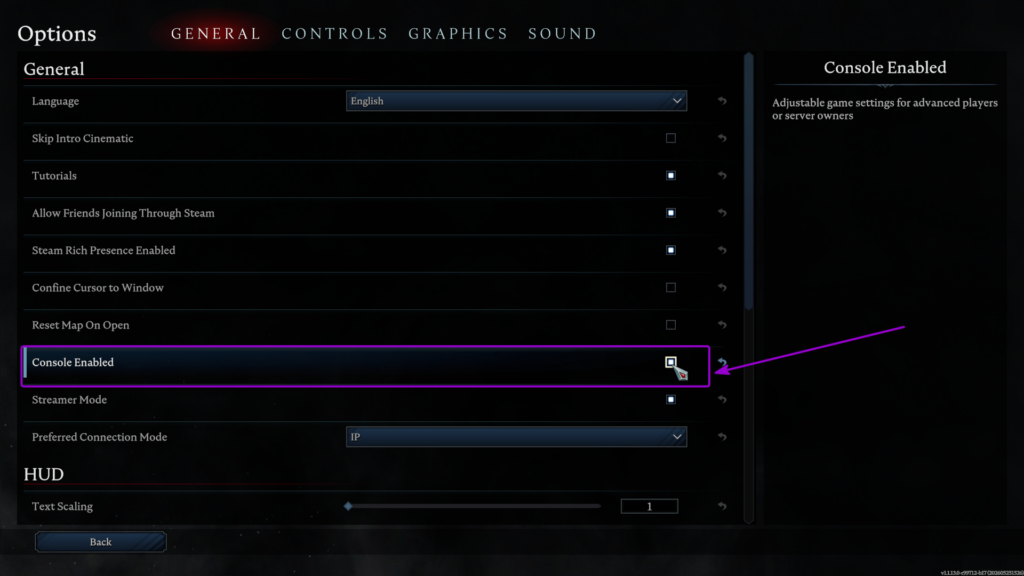
9. Open the In-Game Console
Join your V Rising server and press the key below Escape on your keyboard to open the in-game console.
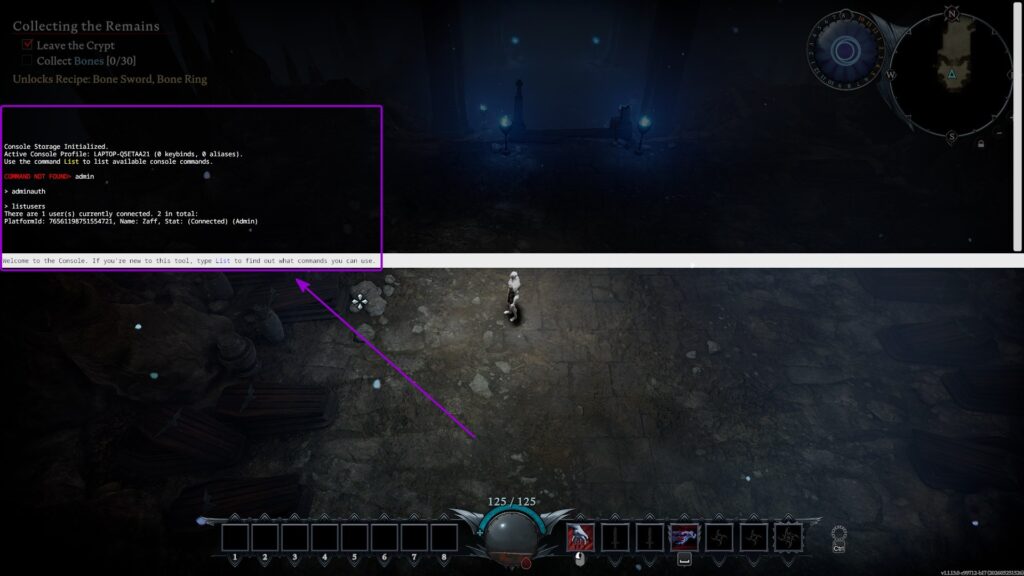
10. Authenticate as an Administrator
Enter:
adminauth
Press Enter to authenticate your character as an administrator.
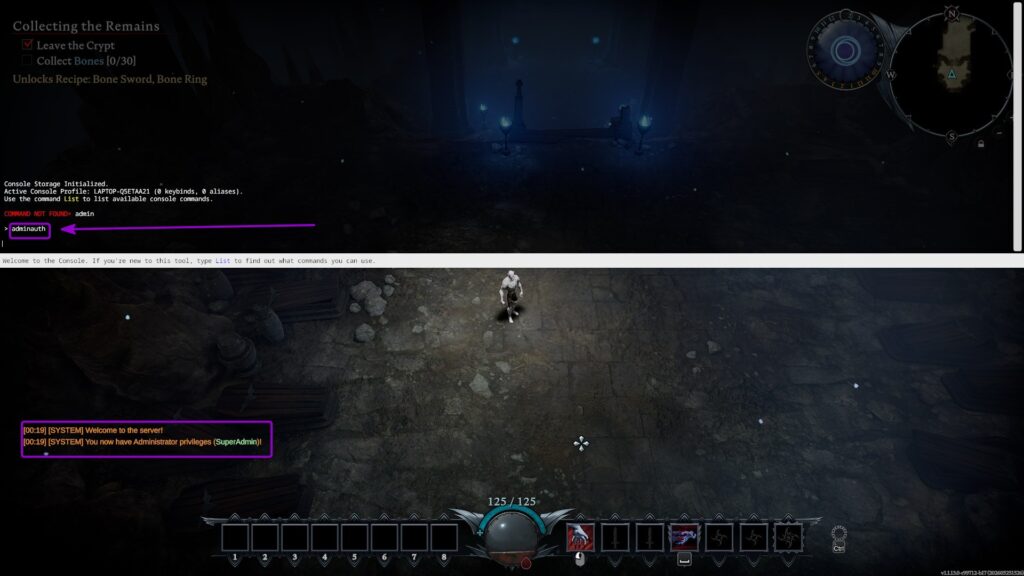
11. Enter the Kick Command
Enter:
kickuser <PlayerName>
Replace <PlayerName> with the exact character name of the player you want to remove.
The kickuser command disconnects the selected player from the server.
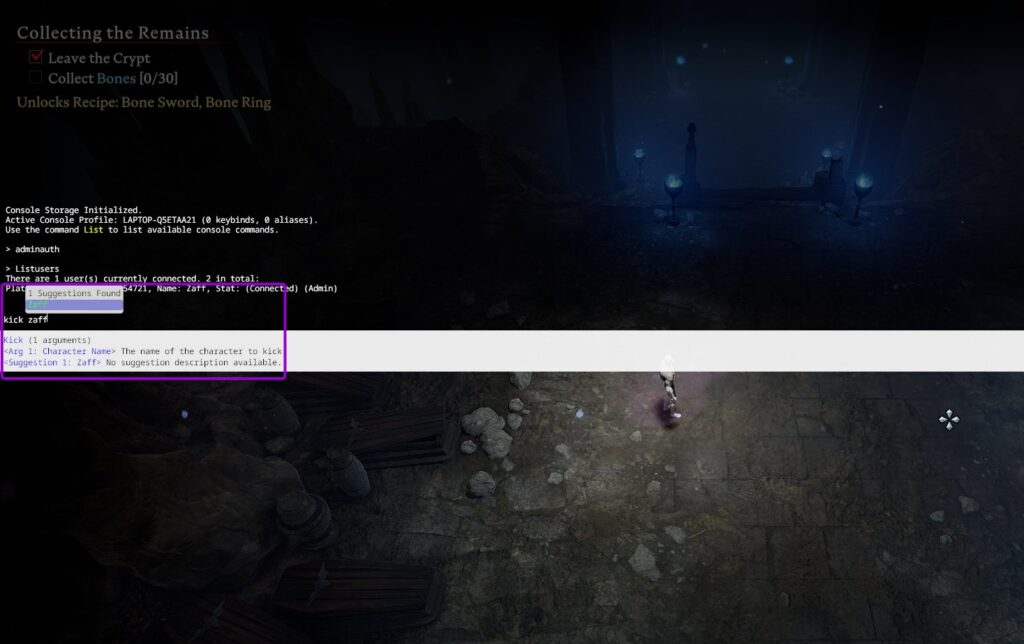
12. Check the Console Output
After running the command, check the console output for confirmation that the player has been disconnected.
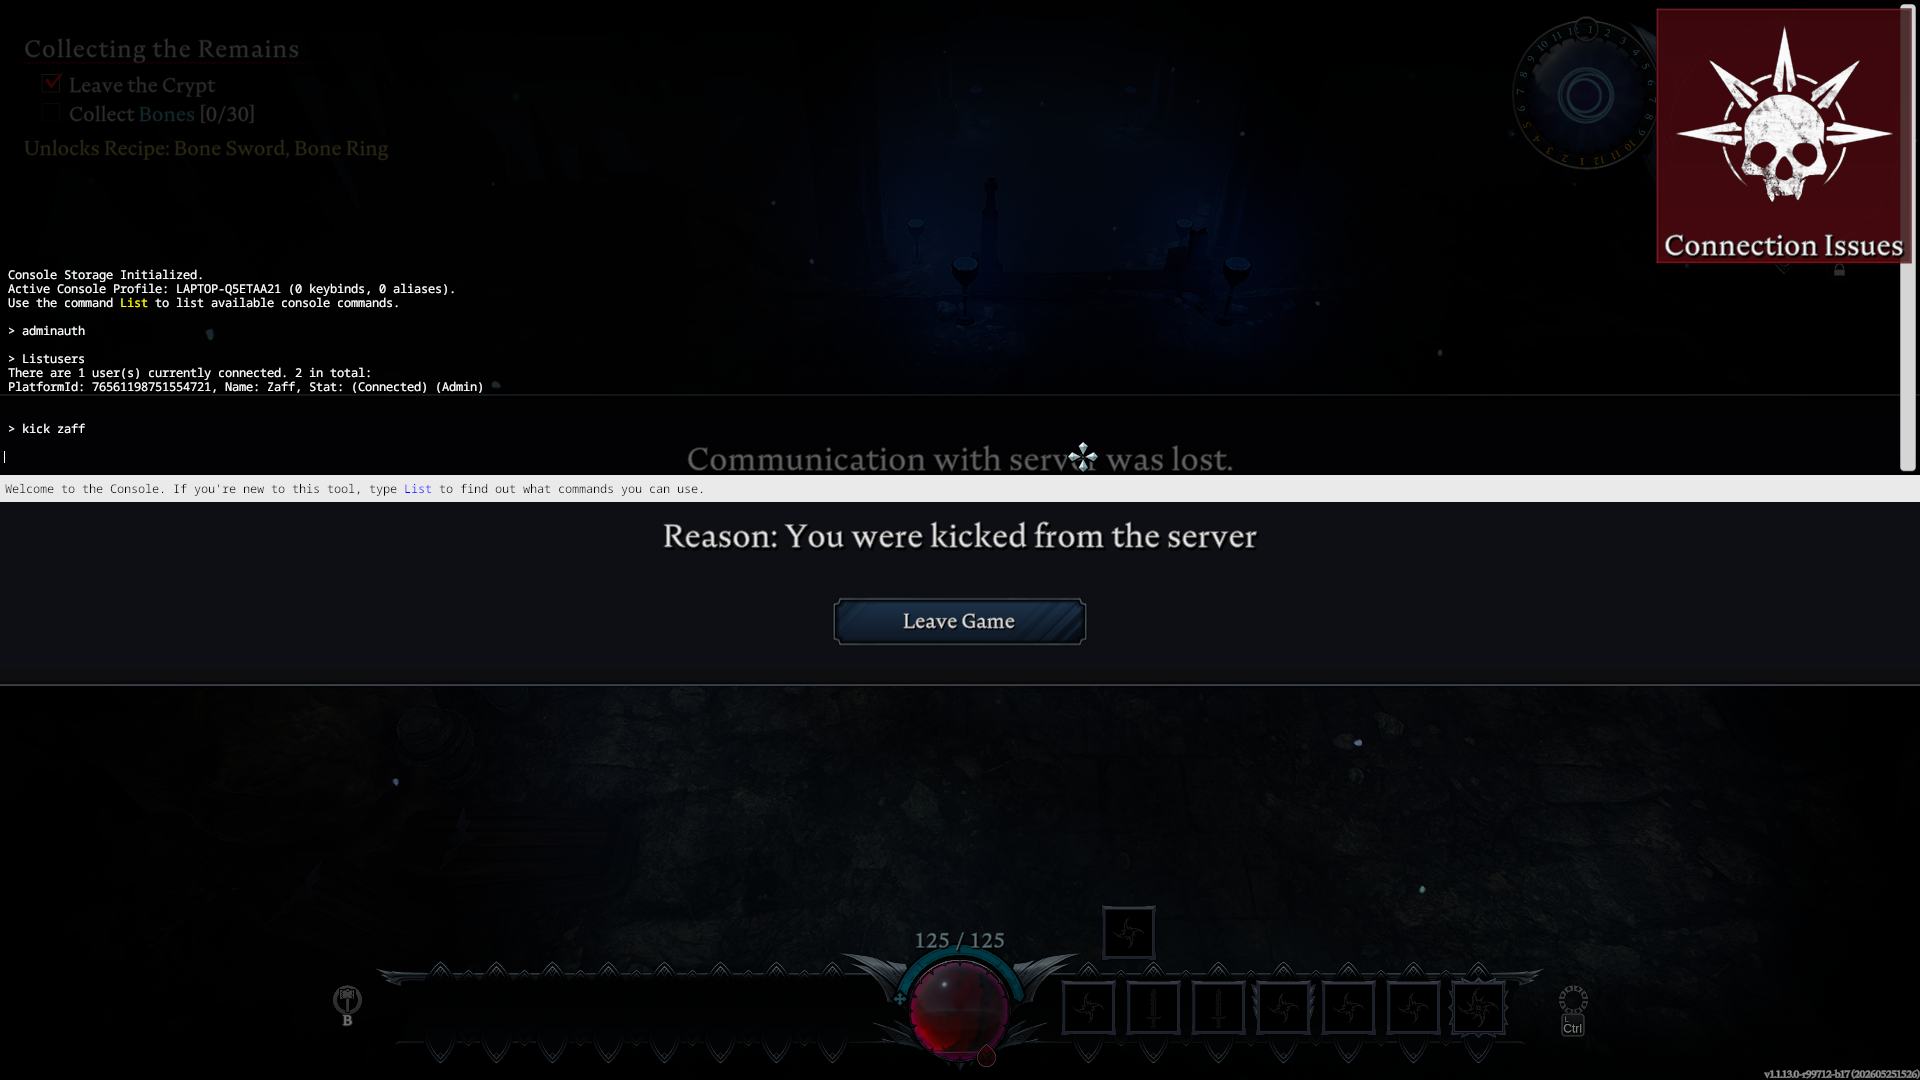
V Rising Server Hosting
Starts at $9.99
